The trends of various areas of art and culture are directly reflected in everyday life. What was previously created by creative geniuses is now adapted for a wide range of admirers of beauty. One of these areas can be called a combination of fragments to create a complete picture. This idea is easy to implement. Creating a collage of photos with your own hands is quite simple.
The history of the emergence of collage goes back several centuries, but at the beginning of the 20th century, this technique reached a new level. The idea of creating such images has become a distinctive trend in modern art. The term comes from the French coller, which means "gluing". With the help of this technique, avant-garde works were created.
A new round in the history of the development of collage technique has spread thanks to two famous artists. In 1910-1912. Pablo Picasso and Georges Braque realized the idea of this composition. Later, this method became widespread and gained incredible popularity.
The set of materials will depend on the main idea and method of manufacture. At minimal cost, you can get by with the most affordable components. But if you manage to pick up unusual bright materials, the collage will turn out to be very original. The main materials can be:

In addition to materials, you will need tools for work: scissors, a clerical knife with replaceable blades, glue, rags.
This is just an approximate list of possible collage materials. The dimensions of the future work of art, as well as the placement, form and set of components are limited only by the author's imagination.
To feel like a truly creative avant-garde artist, you can give free rein to your own imagination and try to realize something non-trivial. For decoration, you can use any little things: buttons, buttons, coins, beads, beads, and more.
It is not at all difficult to create such objects of art. You need to turn on the fantasy, give free rein to dreams and imagination and acquire the necessary materials. Then you can safely proceed to the implementation of the plan.
The work on the composition can be divided into three stages:

There are an incredible number of ideas for posting photos. If the wall is a plain solid background, you can do without any foundation. But if, nevertheless, a decision is made to place images on any substrate, several options can be considered:

To correctly and accurately determine the size of the required coverage, you must first place the photos on the floor. All details should be arranged as planned on the collage. When the optimal placement of the elements has been determined, you can start cutting out the shape of the base.
 Often the main problem is the lack of ideas. Sometimes it's hard to just take and squeeze something new out of yourself. It helps a lot to get acquainted with the implementation of the creative ideas of other people. Looking through other people's work, you can take existing ideas as a basis, bring something of your own and find a unique stylish design solution.
If it is difficult to imagine how this or that combination of photographs on the wall will look, it is better to use special computer programs. They will help you choose the most suitable background, the optimal location and pick up additional elements. And most importantly, this method allows you to see for yourself how expedient the chosen method of placing images is.
The approximate course of work with the program is as follows:
One of the easiest ways to make a do-it-yourself photo collage on the wall is to print an image created in a special program that combines many small photos and attach it in the chosen place.
 In addition to traditional family photos, you can come up with a lot of great photo collage ideas. The main thing is that the finished work of art brings positive emotions, awakens the best memories and inspires.
Here are just a few possible ideas:
When the subject and placement are determined, you need to creatively arrange the photos. You can think of many ways. Here are some options:

Any of these do-it-yourself photo collage ideas on the wall will look wonderful, expensive, elegant.
In addition to the selection of the plot, the definition of the composition and other details, there are several important points. For the perfect implementation of the collage idea, you need to listen to the opinion of interior designers. There are several important steps.
To achieve the maximum spectacular impression, you need to carefully approach the choice of the wall. The ideal option is an absolutely free and plain surface, on which there are no sconces, paintings and posters. In addition, it is best to place the collage on the far wall in order to be able to evaluate the composition at some distance.
Design experts do not advise placing collages on the stairs or in the hallway. In such rooms it will not be possible to achieve the desired effect. Only the impression of having pictures will be created, but not a single structured composition.

It is desirable that there is no large furniture near the wall: a double bed, a wide table, etc. Since it will impede free passage, and the audience will not have the opportunity to see the scenes of the pictures well. Above the beds, it is best to place images of a neutral nature, rather than family photos.
It is important not to overdo it, as excessive piles of diverse shots can break the harmony. The collage was created in order to fill, but not overload the wall. There are no clear rules. Here you need to rely on your taste.
Genre refers to the choice of plot and stylistic concept. This was briefly discussed above. In addition to choosing an interesting plot, you also need to determine the harmonious combination with the interior. For example, black and white shots are suitable for a vintage setting. And in the children's room you can put bright color images. You can hang paired images (a guy and a girl) in the bedroom. And the classic style of the interior will be wonderfully complemented by strict traditional portraits.
Frame selection is one of the most important steps.. It is desirable that all frames are harmoniously combined. Even if they differ in size, the material, texture and width must be identical. You need to stock up on a few spare frames in advance. Perhaps, over time, there will be a desire to supplement the existing collage with new images. However, this technique is well suited for a strict interior in the style of minimalism. Usually this design is characteristic of people who love order in everything.

The texture and color identity of photo frames is not at all a prerequisite. For those who prefer originality and even some confusion in the interior, a composition from different frames is great. But this idea should be complemented by the environment.
Before you print your images, you can experiment with different sizes and determine in advance how the photos will look on the wall. To do this, you need to cut out fragments of the expected shape and size from paper and distribute them on the wall. See how harmoniously they look: whether they overload the interior, whether they fit in size, etc. Perhaps at this stage there will be a desire to bring something new.
 Undoubtedly, a well-executed idea can decorate any room. There are no clear restrictions here. It all depends on the personal tastes, preferences and imagination of the author. Such a composition can be safely placed in an office, library, bedroom, kitchen or living room. The only exceptions are cramped rooms, narrow corridors and closed stairs. However, there is a solution for these cases as well. Instead of a complex intricate composition, it is better to mark up several large shots.
Collage placement is one of the most affordable ways to enrich the interior. This gives comfort and fills the space with warm memories, dreams and positive emotions. Such a composition can be created immediately or gradually acquire new images.
Who would have thought that successful shots exist not only to be stored on computer hard drives, to be bragged about on social networks and shown on smartphones and tablets. But good shots, reminiscent of the happiest and most joyful moments of life, are really a worthy decoration for the interior of your apartment. Therefore, we offer you a master class in which we will tell you how to make a photo collage on the wall with your own hands.
From small photos, you can make a beautiful photo collage on the wall with your own hands, which will become a canvas of family history and will remind you of the brightest moments in family life.

So, let's start together a photo collage on the wall with your own hands.
Decide on a suitable empty wall. In Photo 2, it is located to the left of the entrance to the living room.

We select photos for the future panel, sort them into collages to print on a color printer. For example, you can place an image on a black background with a white border.

Cut out the photos with scissors or a utility knife.


Paper photos on the wall will look, to put it mildly, unaesthetic. Therefore, they can be placed on a sheet of ordinary or foam board, plastic. The main thing is that it should be a dense material that is able to keep its shape well.
We outline the base and cut out the blanks with a clerical knife.

We glue the photos on the prepared PVA base or with a glue stick. By the way, in this way we saved a significant amount of money on photo frames, which is good news.

Now we put our photos on the wall.
However, it should be noted here that your collage will hang on the wall for a very long time. And when removed, traces of glue or holes will remain on the wallpaper. But if you need a temporary option, then the basis of the photos must be attached to double-sided tape. Alternatively, you can glue all the photos on a large sheet of plywood and hang it like a picture on a nail. True, you can attach it tightly with an adhesive gun.

For accuracy, you need a long ruler. It is convenient to draw a thin line on the wall with a pencil, which will be the upper border of the panel. For these purposes, you can use masking tape.

After gluing the first row of photos at the same distance from each other, use a ruler or masking tape to evenly position the next row.


To decorate the house with original and beautiful paintings, it is not at all necessary to be able to draw well. A little imagination, good taste and improvised materials, and now you have in front of you a one-of-a-kind author's collage, ideally suited to the style and color scheme of the interior. The collage technique not only allows you to show maximum creative freedom, but also preserves pleasant memories of memorable events, travels and people.
You don't need expensive materials or special skills to create a vintage style collage. The objects around you will serve as a wonderful source of inspiration. Everything will come in handy: old postcards and photos, beads, ribbons, newspaper and magazine clippings, paints, dried flowers, lace and shells. Moreover, each collage is an absolutely unique work that cannot be repeated.
How to make a vintage style collage with your own hands? There are two main approaches to creating compositions in this technique. You can start from the materials at hand, or you can proceed from the theme and style that you want to create. In this master class, I propose to analyze the basic techniques that can be useful for creating a collage in a retro style, characterized by the use of vintage or artificially aged materials and objects, and which fits well into Provence, country, rustic or even classic interiors.
The list of materials for a collage is always conditional. You can replace some of the proposed options with those that you have at hand, however, you should carefully consider the recommendations regarding the selection of the base, glue and other technical points.

The past is an inexhaustible source of inspiration in collage work. You can artistically arrange old family photos or old postcards in the form of a three-dimensional collage, or compose a composition from finds found at a nearby flea market or in a grandmother's chest.
We start by choosing a background, theme and suitable materials. I recommend using a primed canvas as a base, preferably on a stretcher. It is convenient to paint the canvas with paints or decorate with paper, besides, it looks good if it is hung on the wall with or without ramie.
Pay attention to the composition. If, like me, you decide to use a rectangular image as your centerpiece, it makes sense to use a rectangular canvas as well. For a square or round motif, it is better to take a square canvas.

To make the work more dynamic, the composition can be made asymmetrical. For example, I used a diagonal version of the composition with an accent in the center.
For a vintage collage, of course, it is better to use old, yellowed paper, old postcards and photos, clippings from old magazines. Old sheet music, maps and posters can also be a source of inspiration. For this work, I used an antique postcard from the early 20th century depicting a girl sitting in a boat. The theme of the pond was inspired by the brownish-green color scheme and the decor in the form of various plant motifs. Of course, you will certainly use other materials, this is just an example of how the decor and color scheme can support the main theme of the composition and be directly related to it.
If there is no fear of materials at hand, the paper can be aged artificially, for example, by printing the old image you like on a printer and giving it a shabby look later.

The background of the collage can be completely sealed with the selected decorative paper, or it can be painted with paints. For work, I recommend using acrylic paints. They are sold in separate jars and tubes, have a rich and lasting color and fit well on the canvas. It is convenient to apply them with a wide and flat brush made of synthetic fiber, practically without wetting with water and mixing, if necessary, on the palette.

The paint should be applied in an even, opaque layer, if necessary, adding the necessary additional shades to the main color. After the canvas is completely covered with paint, it must be allowed to dry completely.
It’s just that a photograph on a colored background looks boring and not expressive, if you add paper appliqué elements to it, it will certainly turn out to be much more interesting. We begin to select paper.
In scrapbooking stores, you are sure to find many options for interesting paper with various patterns that can be useful in your work.

You don't need to glue anything at first. We apply various elements and look closely at how they interact with each other. When the location of the largest parts is determined, photograph it, or carefully mark the edges of the parts with a simple pencil. The largest parts (notes in my case) can be glued using PVA glue. We apply the glue in an even, thin layer, glue the paper, carefully smoothing it in the direction from the center to the edges so that there are no bubbles and wrinkles.
Background paper can not only be cut with scissors, but also carefully torn off, leaving deliberately raw edges. In addition, aged paper can be wrinkled a little, this will also emphasize the effect of time. These are simple, but very typical details for vintage compositions.

Don't be afraid to experiment with materials: in this case, you can see that the old, broken notes are quite organically combined with new stickers. Textile elements also fit well into the vintage style, especially if you use thin lace or braid that has already yellowed from time to time (similarly, you can soak the new material in tea).

Note the interesting effect of using a special brown ink designed to enhance the illusion of aging. Using a soft foam sponge with their help, you can slightly emphasize the edges of the composition or highlight some accents. You can find these inks at scrapbooking stores.
A similar effect can be achieved by crumbling brown pastel chalk and gently crumbling with a brush or soft cloth.

A collage is usually a multi-layered composition. This photo shows how the work continues in the various layers. After the background has been painted and notes have been glued to create a diagonal composition, you can move on to smaller details - arrange appliqué and sticker elements, toned the corners of the canvas. I decided to highlight the central photo, so I emphasized its edges with tinting.

For vintage style, the use of old beads, copper parts, worn buttons or stamps is quite typical. Since my collage also exploits a natural theme, voluminous natural elements will also be a great addition to it. Even the pieces of glass found on the shore and turned by the sea found their place!
In order for twigs, copper stripes or other heavy parts to adhere well to the base, they should be glued with a silicone glue gun or transparent, reliable Moment-Universal glue.

The details of the collage should be interesting to look at up close, but it is important not to overload the composition so that the main focus is easy to read. Periodically move away from work in order to evaluate its progress from the outside.
When the collage is ready, it can be placed in a frame or hung on the wall in its original form.
Do you want to please your loved one, revive happy moments in your memory or stylishly decorate the interior? Make a beautiful photo collage with your own hands!
We love to look at ourselves, relatives and friends. We love capturing important events in photos. But in the age of digital technology, pictures are on a computer or phone, lost in social media feeds. Gradually, folders with photos become more and more difficult to find the right ones. And so I want to look at the brightest shots more often! Take and combine these pieces of life, assemble them into a beautiful, bright mosaic. That's what collages are for.
Most likely, you created the first collages as a child - school newspapers, gifts to relatives and friends. In order to make a collage of photographs, it was necessary to print them out, prepare the base in the form of a sheet of whatman paper, board or canvas, cut out everything you need, arrange and stick it on. A difficult task that takes a lot of time, effort and resources - printing a photo alone is worth something. Now it is much easier to create a photo collage, since a special computer program has appeared.
In fact, this is still a do-it-yourself collage, because you choose the photos and come up with the design yourself. However, creating collages on a computer has a number of obvious advantages. Let's look at 5 main ones.
To create a classic collage, you will need a base made of paper, cardboard or wood, several photographs, colored paper, postcards and newspaper clippings, scissors, and glue. This is at least, and more interesting works are decorated with fabrics, natural materials, beads and similar trifles.In order to start working, you need to clear the table, collect everything you need, pre-lay out the elements on the base, experiment with the composition, and then cut and glue. You have to set aside a whole evening to do everything in one sitting - who wants to re-lay out all this office.

When working on a computer, you do not need to spend money on materials. No need to look for or buy consumables, print photos in advance. You can give your project at least half a day, at least half an hour - and then just save and continue when the time appears again. But the main thing is that the program has a lot of ready-made design templates for different holidays. It's no secret that one of the most difficult stages is to come up with a composition and style for a future craft.
When working with paper, scissors and glue, you have no room for error. Cut off the excess - you need to take a new photo. Overdoing it with glue - the same thing. Toward the end of the work, we realized that another composition would have looked better, or that some important shot did not fit - we had to redo everything from scratch. The main rule of ordinary collages: measure seven times - cut one.

When creating a collage on a computer, you can experiment. We copied the original photo - and cut it as you like and as many times as you like. You can endlessly change the composition in search of the ideal. I didn’t like it - they handed it over without spending a single sheet, not a drop of glue. And if suddenly something does not fit or, on the contrary, looks too small, you can simply stretch or compress the image. Thus, working in the PhotoCollage program is much more comfortable psychologically, and the opportunities for creative experiments are wider.
In addition to the actual photographs, collages use many other elements. It can be clippings from glossy magazines, figures from colored paper, old banknotes and coins, buttons, pieces of fabric or foil - everything that can be found in the bins. This is definitely not in the program, you might think, and you will be mistaken. The new version of PhotoCOLLAGE provides all the decor elements.
You can add beautiful lettering without the fear that the letters will come out different in size or slant, as is often the case with handwriting. You can add photo frames using ready-made templates, or create your own in the constructor. You can apply spectacular photo filters to your photos or use masks to make the edges of your photos more interesting.
You can decorate the collage with clipart - pictures on a transparent background. Use the catalog with blanks or add your own elements by cutting them out from any images - everything is just like in real life. You can even make inserts from newspapers that are popular in collages - after all, most publications now have electronic versions. We go to the site and take a screenshot of the title you like, and then just overlay it. And you can specifically look for a substrate for craft, newsprint or gloss by typing text on it in a beautiful font. By the way, with the help of the program you can create not only collages, but also postcards, and even photo books.
Different colors, sizes and shapes of elements - this is a creative chaos that can turn into harmony in a bizarre way. A more conservative option is to choose images that are similar in shape, size and tone. Get a strict and stylish collage. The extreme form is strict geometry (for example, 16 square photos combined into a 4x4 square). And it can look delicious too!

Even a graveyard of fridge magnets can be turned into a masterpiece of art with the right taste and time. If you really don’t know what design will successfully fit into your interior or the interior of the person to whom you want to present a collage of photographs, you will have to experiment. It’s a shame to make a collage with your own hands, and then find out that it didn’t fit the style or simply doesn’t physically fit on the wall.
Agree that it is easier to shuffle pictures to achieve the ideal on the monitor screen than to drive in and pull nails out of the wall or stick and tear off adhesive tape. And what, for technical reasons, is unrealistic to do with physical objects (for example, put plates or pictures in wooden frames on top of each other), is possible with virtual ones. The only limit to creativity here is your imagination.
The classic collage will remain the one and only, but it is difficult to consider this as a virtue. For example, you decide to prepare a gift for all your colleagues or a few close friends. Do a few things by hand? Or you need the same collage, but in different sizes. Or you want to repeat your successful work in a year. Recall? It is hardly possible to make the same collage with your own hands.

In the PhotoCollage program, you can choose any format and size of the collage base you need for subsequent printing. Fortunately, now in photo salons they also print images of large sizes - for example, A3 or A2. The choice of paper (glossy or matte) and lamination is already a matter of having free money. You can always edit, replace or add photos to the finished project. And of course, you can send the electronic version as many times as you want to friends over the Internet or print it.
We also promised you examples and ideas for inspiration. In the gallery below - 10 striking works created using the PhotoCollage program. Do you want to make the same collages from your photos? Just .


Each of us has a huge photo archive, photos accumulate on electronic media and it is not always possible to see what interests us at the moment. There are photos that I would like to always have before my eyes, whether it is a family history, a memory of relatives and friends, pleasant events or pets. From this we can conclude that photographs are one of the best decorations for an apartment. They will enliven the atmosphere of the house, bring comfort and allow you to create a unique style of your "nest" without major alterations. In this article, you will learn how to make a collage of photos with your own hands on the wall. The remarkable thing is that when creating this wonderful decor, everyone at home can take part - and just look there will be a new photo of the “happy moment”.
Collage - Literally translated from French as "gluing". In art, they call it a method of decoration, where a material of different color and texture is glued onto a base.
Before starting work, you should decide on the location of the collage. The room chosen for placing the collage should be spacious enough, for the wall where we want to place the photos, a good view is required, about 2 meters of free space to cover the entire composition. There are many recommendations for accommodation, which one to choose is up to you.
For example, you can choose a wall in the hallway or kitchen, however, in this case, due to the small size of the premises, there is a danger that the composition will be “lost”.


Think about what photos will go to the design of the collage. One of the main rules is unity of subject matter, subject, such as wedding photos or photos of children. Before placing a photo collage on the wall, it is recommended to lay out the photos on the floor and evaluate their location. At this stage, you can move the photo cards or add new ones.

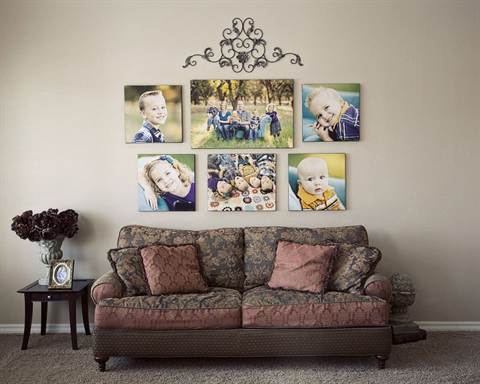
The photo on the wall should be placed in such a way that the central line of the composition is at the eye level of the person looking at it. If the photos are different in size, then the largest one is located slightly above this level, so that it is more convenient to view the smaller ones. The composition should also not be placed above a bed or sofa - it will be simply uncomfortable for you when you want to look at them, and even if the fastening is incorrect, the composition may fall.
Favorite moments of your life are safer to place above the head of the bed, black and white photographs will look very stylish.

When placing photos, you can use ready-made design tips, or come up with your own, the main thing here is to feel the general style of the room.
You can use frames that are the same size, color, and style, or multi-colored, up to a maximum of three different photo shapes or sizes. Frames are an important element of decor, and not just “framing” a photo. With multi-colored frames it is more difficult, as they require the impeccable taste of the author of the composition. DIY frames are very original, especially in the nursery.

If the photos are different in size, then they should be placed from large to small. Such a composition will look more dynamic.

Here is an example of such a way to design a collage:

Let's consider the following workshops on making a collage from photos: on a large drawing paper, draw a base on which photos are glued. Photos can overlap, but the composition should not be oversaturated.

Printed photos of the same format in the same frames are placed on the wall. We attach photos at the same distance from each other, measuring the desired location with a ruler or masking tape.
If you want to be creative, you can place photos in a simple and original way. Attach a clothesline to the wall in the room and attach the photo with clothespins. Such an exposition is very easy to update periodically.

A collage of many small photographs placed in one large frame will look original. For the base, we need, for example, a sheet of plywood ennobled with a beautiful baguette frame. The result is a wonderful whole "picture".

One of the latest creative ideas is to place photos without a frame at all. You will need any substrate: cardboard, plastic or other material that can hold its shape well. The base must be drawn and cut out with a knife, while the size of the photo and the base must match. If you wanted to make the size of the base a little larger, then you get a great frame.


