In this article we will deal with how to make a lamp do it yourself. In the initial publication of the cycle - - general requirements for quality, methods of forming a light flux, as well as how to choose a light source and security primarily - the rules for connecting a stationary lamp to the power grid. From the previous article we learned how to do the main lighting parts of the lamp. Now it's time to take up the solid, reliable and beautiful design basis of all this.
LEDs as light sources are becoming increasingly popular: they are very economical, durable, almost do not heat, which gives ample opportunities for self-design and design. In addition, low-voltage nutrition makes LED light sources safe. Therefore, in this article the essential share of the material is devoted to how to independently make a LED lamp.
However, the quality of light from LEDs has not yet reached the ideal: The spectrum is pretty hard. It is possible to soften it with various lighting techniques, which was considered in previous articles. But due to low-voltage nutrition, the street or garden LED lamp can be manufactured independently without special precautions, as well as to be autonomous; Then there are surround earthworks and cable laying on the site. In this section, we are more and engage in lamps on LEDs.
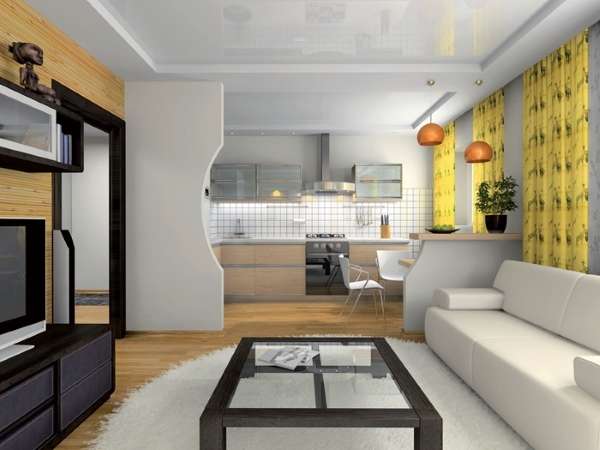
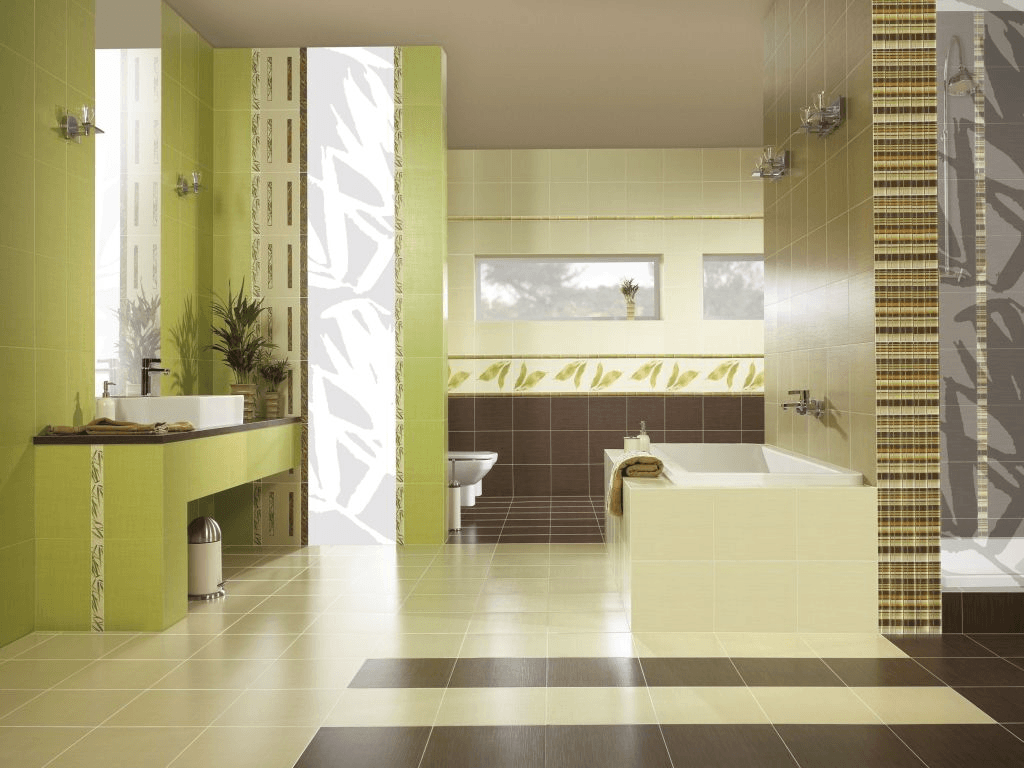
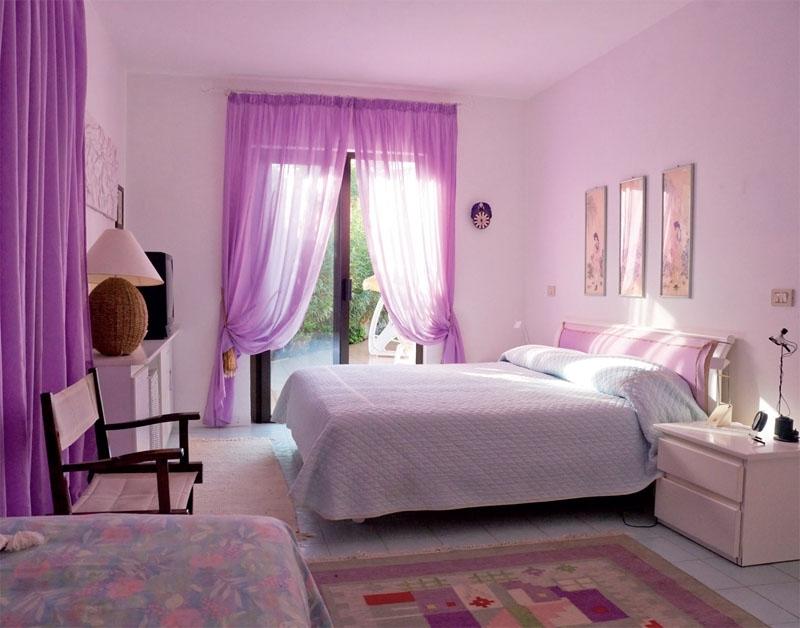
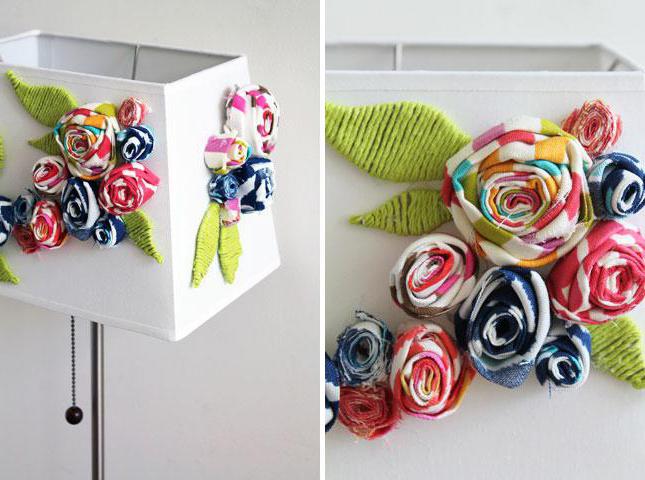
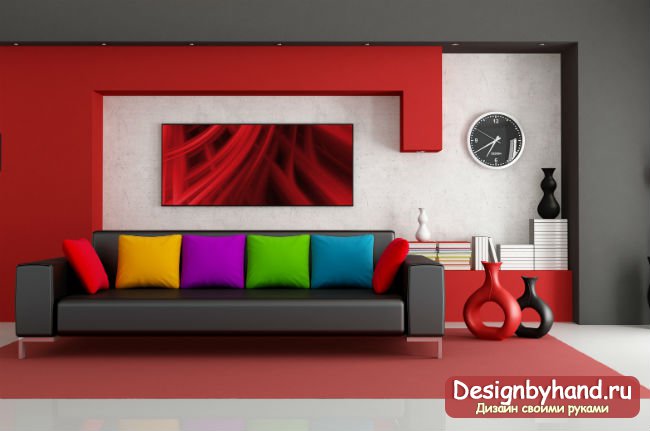
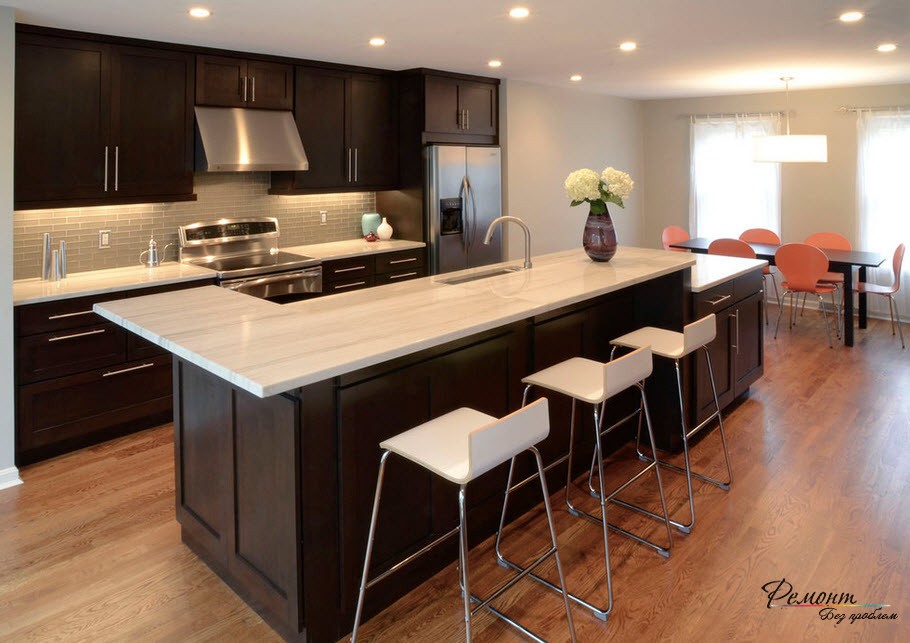
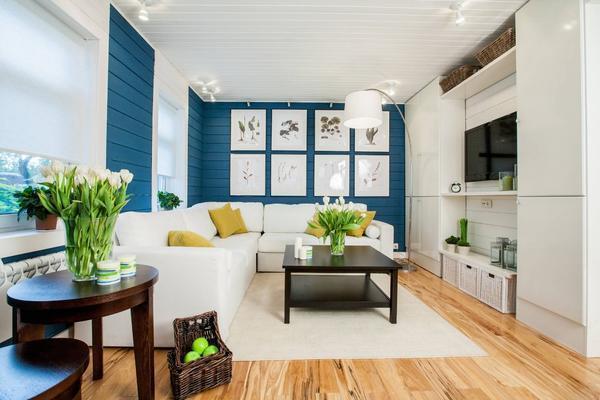
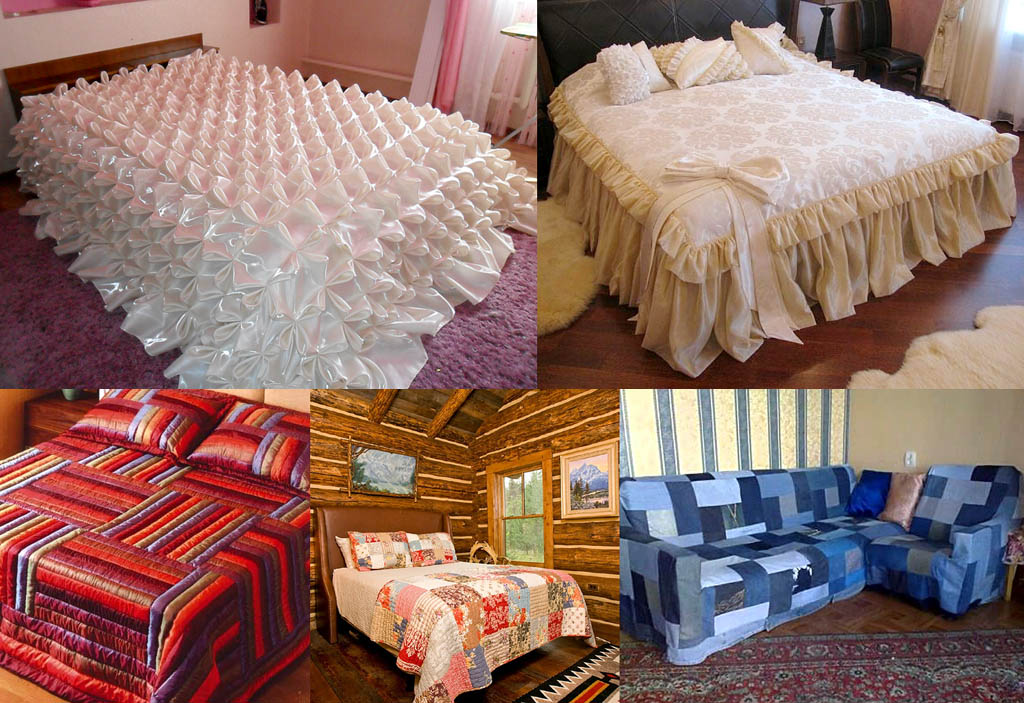
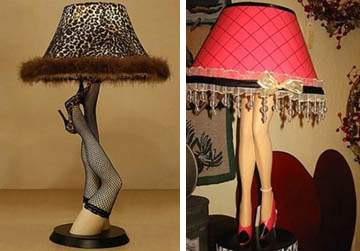
Some samples of what can be achieved by holding the lighting with their own hands, are shown in the photo. A similar selection of "for ideas" or "for inspiration" will be anyone who knows how to use the Internet. And here we will deal with things not so aesthetic: how to embody it all in the material. Cheap, reliable and practical. Preferably - at home, "on the knees."
To make a good lamp, expensive and / or hard-to-reach materials do not need. Former technologies are focused on incandescent lamps, heins and consuming high current. The current ammodelkins have lamps of housekeys and LED, distinguishing little heat, which makes it possible to simplify the design.
For the manufacture of the lamp, nor in view, nor in quality is not inferior to industrial samples, we will need trimming of metal tubes, steel wire with a diameter of 1.5-2.5 mm, leaf steel-galvanized 0.4-1 mm thick and plastic slices or inexpensive Plastic products, see below. And in many cases, to achieve the desired result it is possible to do and unnecessary trash. Treatment of wood for a complex lamp - the case is special, we will not go around it.
Note: Old good glass is also not worth discounting. Look, for example, master class: dIY.RU/POST/3916/. This is what you can achieve, working at home with such hard material. The only small "But" is that the author of the product (a person, without any doubt, is very skillful and more impact) calls the cut, actually edging. However, how to call - the case of books, and the master is enough so that the thing is good.
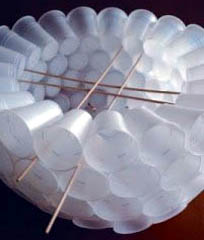
Examples of excellent lamps from undergraded materials, namely, trimming wood and paper - all known Chinese lanterns, see fig. When using modern light sources, their fire hazard is insignificant, much less than the electric kettle. The base is most often a wrapping frame, plated paper, pos. 1. For the frame of the fact that on the pos. 2, fine bamboo sticks will be better (you can split an old rod to strips), or the ends of modern fiberglass rods; Sold in stores for fishing. The joints are wrapped with thread and are sick. Paper (preferably rice) after pasting is slightly sprayed with water from the spray. Drying out, it will stretch. After that, the strength of paper is varnished.

The Chinese flashlight can be made entirely of wood: chopsticks for food or table skewers (wooden spots, on which kebabs and lula-kebab are served to the table). Those and others are made of bright, fairly reflective light, wood. And her slightly rough surface effectively dispel the light, which softens it.
From sticks for food, having their embedded heads alternately to the left, then right, the side light light panels are typing, pos. 3. And from the cutlery of skewers, a good ceiling lamp is obtained for a kitchen or hallway, pos. 4. The ends of the sticks (they are made of soft wood) simply pierce the sewing needle with a fishing line in it.
But back to the materials, they are not finished yet. Excellent details of chandeliers, desktop lamps and floor lamps (cups, caps, see below) are obtained from multiple plastic dishes - Pial, glasses, saucers: The side on the bottom is neatly spilled or stamped. Then this place passes 2-3 times more and more small skirt; The last pass is "velvet" - and polished felt with paste gay. Decorative, lighting and technological (ease of processing) the quality of such parts is very good.
The second type of plastic, which allows you to make a very original lamp (see Fig.) - Polymer clay or simply plastic. According to lighting properties, it is not inferior to a light tree, and in thin, 2-3 mm, a layer, translucent, like a milk glass, i.e. Very well softens the light.

The polymer clay is produced in various colors immediately-plastic in polyethylene packages and bars like plasticine. The latter first are quite firm, but during the kneading soften. To speed up and relieve softening, 3-4 drops of vegetable oil should be launched on the bar, and begin to mive when it is absorbed.
Military plastics make lampshades on a mandrel, lubricated vaseline. Immediately, if necessary, the brush is puffed up the texture, right below in Fig. To obtain an openwork ceilfone, the tip of the package is cut and squeezed out the mass of the sausage. After about a day, the product will dry up, then you can, while not removing from the mandrel, cut figures, festones, frills. Fully product dries over 3-7 days.
Brusche plastic is used for the manufacture of supports of lamps. By informing the workpiece, it is baked in the oven at 120-130 degrees. When a brownish crust is formed on the product, the gas is covered to a minimum and "predeter" for another 1-3 hours, depending on the size of the part. It should be cooled completely in the oven, which is undesirable to open at the same time. Purchased blank can be cut, saw, drill, polished, painted. In this way, the enclosures of the lamps are sometimes not just original, but also quite spicy (see Fig.), Or even the frequent ones on the verge of decency, or even for it.
Since we are talking about the stands, let's try to make a lamp from the bottle. Ceramic vessels for beverages worked out by branded designers deserve better use than garbage, moonshine or recycling for pennies.
There are 2 problems: stability and holes for entering the cable and switch. The first is solved by sand, covered in a bottle of 2/3 or 3/4. To solve the second, it seems to be a tubular diamond drill, expensive, quickly wearless, and requiring a high-turn boring machine. And we will bypass without all this:
To drill a drill with a copper tube sandwich in the cartridge, it is better to put it in the bed that turns it into a desktop drilling machine. Such beds are sold in instrument stores; Prices are divine, the benefits of the master is invaluable. Moreover, it is possible to buy a turning table with a degrees.
Keeping ceramics with copper with corundum shocks: I pressed a little - raised - I pressed again - raised. The abrasive particles are first entering copper and drilled, but they immediately get out and crumble. Pulse drilling all the time updates the corundum "spraying" on copper, and the oil does not allow powder to operate and speeds up work. The main thing is that the tube at each feed falls exactly to the already selected groove.
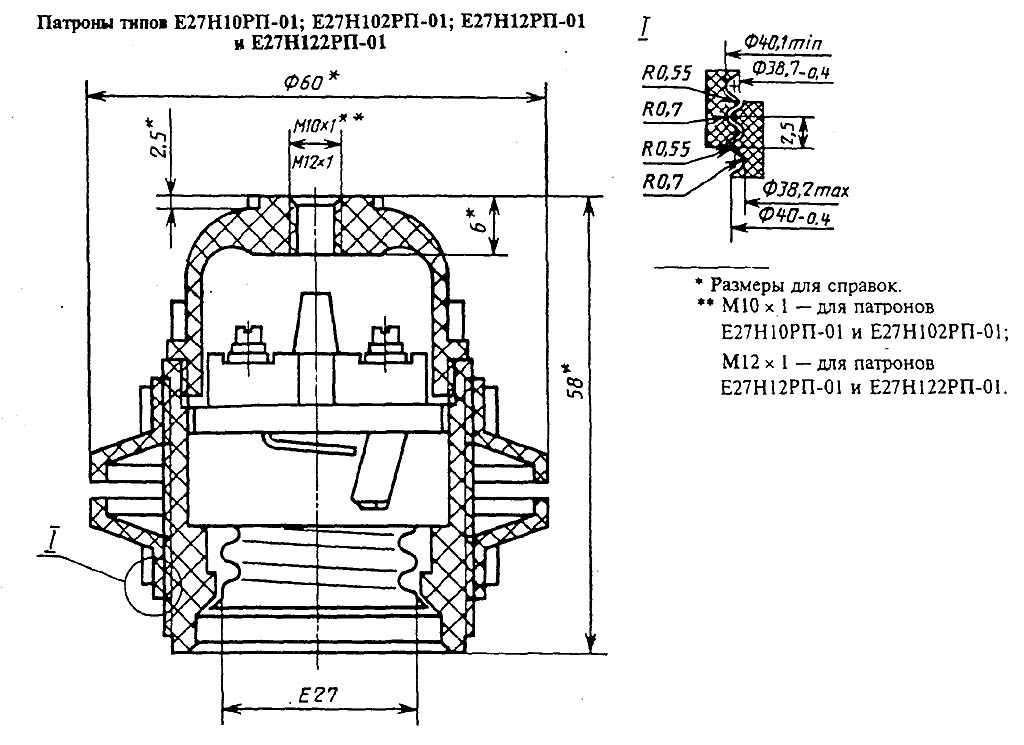
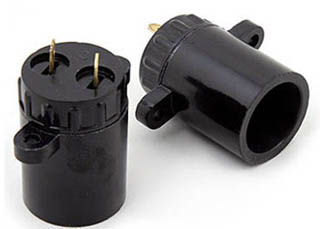
The novice diesel engineering is best of all, perhaps, use the cartridges for lamps under the usual E27 base with the fastening of the withdrawal nuts (threaded flanges); His designation begins with E27n, and the drawing is shown in Fig. Fasten such a cartridge, or the usual with a skirt, a threaded fitting in the lid will not work: the M10x1 or M12x1 dice if there is a house, a manual gate, cut into the thread on the thin-walled tube, without cutting it and not turning it, is very difficult, even with lubricant. Under the fastening flanges will have to make a fastening ring, as described in the article about the lampshades, it is much easier.
Note: If a wall lamp is made, in which the lamp is located along the base, then the cartridges with the side plank are usually used, see fig. But they are more expensive. In this case, it is also possible to do with flange patron: from the wire flexion ω-shaped clamp and fasten it to the base with self-draws.
The second, which will be needed - a screw terminal connector, or a terminal block, or just a terminal bar for connecting the lamp to the wiring. For a chandelier, it is obligatory not only for the convenience of installation, but also according to the requirements of TB: Suddenly the chandelier will break down, her thinner wires will break out of the terminal bar, and the ceiling wiring will not suffer, which will prevent the accident and the ceiling and dying work on repair.
The terminal bar is better to take the type "scallop", see Fig.:
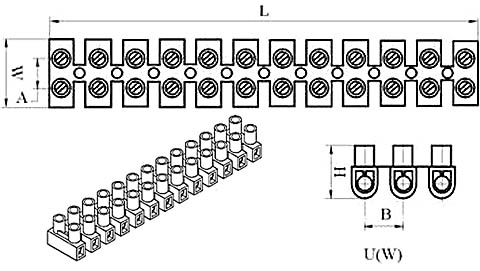
Such compacts are reliable, exclude a random short circuit, and snacking jumpers between sections, elementary to obtain a connector to the desired number of wires. Each terminal is allowed to introduce no more than 2 stranded wires by cross section of copper to 1.4 square meters. MM in the aggregate and no more than 1st single-core, regardless of the cross-sectional area of \u200b\u200bits conductive veins.
The tree, on the one hand, is easily processed and it looks solid. On the other hand, to make an elegant wooden lamp, you will have to use some special technological methods. Which we will look at.
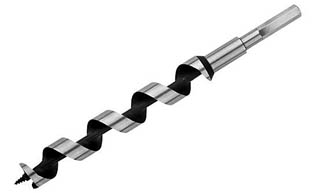
The first problem that gets up in the manufacture of a wooden lamp: how to do in the long items of cable channels. For this, without special equipment, "on the knee", you can use a tree drill with a narrowed 6-graded shank, see fig. It is tightly dressed with a metal tube, crimped it, and the opposite end bend t-figuratively to turn out to be hand-made knobs; To facilitate and greater accuracy, the drill is better to take two-year-old.
Through axial openings in long wooden parts are drilled in advance, to bending:
The lamp of curved wooden parts is quite possible to make with their own hands: a weathered fine-layer wood softened under heating, not resolving, and having cooled, retains her shape. The lighter is the bamboo, nut and soft wood, eg. Linden. More difficult - Middle hardness wood: Maple, ash, Grab. For bending oak, beech, rowan, etc. Hardwood newcomer is better not to take. MDF is also nice.
Wood is bent or sparkling in boiling water, or heated to more than 150 degrees. The first way is easier, but suitable, except bamboo, for few breeds. The second is more difficult, but more precisely, because Wood does not swell and when cooled, respectively, does not give a shrinkage.
For bending wood, you need a segment of a steel pipe: with a brewed end for breaking or with both open to bending dry. Pipe for sprinkling is installed obliquely, placed a blank in it, poured with riding water and boiled. Boiling water should be stormy so that the workpiece bathes in steam bubbles. The process continues 10-120 minutes, depending on the thickness, rock and the state of the tree. It is possible to remove the workpiece for a few seconds to check its readiness, but only steep boiling water is needed to pull the swamp water. Turn the billet in the pipe with a construction hairdryer. First, on a tree sample, you need to check what temperature it can withstand without charring and cracking.
The cables in the tubular parts of the lamps are tightened with a thrust guide - "Fishing rods" - from a copper wire with a diameter of 0.5-0.7 mm. "Fishing rod" must be completely even; A smoothly curved wire mixed with a coil can be lost in a narrow channel. The Wire "Fishing Fishing" is straightening, stretching through the rag squeezed in a fist. The best guides are obtained from an enameled winding wire, it is smooth and slippery.

"Fishing rod" is introduced from a long end. The tip it is tightly bend it tightly, see fig. To be rounded. In the curved channels pushed, slightly feeding and turning. When moving from the channel to the channel (see below), the end end is guided by a thin long tweezers or a screwdriver.
When the end of the traction appears from the opposite side, it is cleaned with 20-30 mm and are detected. The cable wires, up to 3 per 1 "fishing rod" are cleaned. Then all together twist and pecks. The twist is flex the opposite direction of the tightening, so as not to clinging. Tighten, alternately feeding the cable and tightening the guide. When tightening the cable in the channel should not be stretched all the time! If it hooked - they are pulled out a little back, they turn a little and pull again.
Note: In a straight metal tube with an inner diameter of 12 mm, you can tighten up to 4 2-wire cables in double insulation with a cross section of copper for up to 0.5 square meters. mm. In the channel of the same diameter in the tree - only 1 the same cable.
Suspension of the lamp to the ceiling or wall is the most responsible and vulnerable node. Moving the lamps in the 1st point is allowed only if the base is viscous durable material, for example. Oak beams, pos. a) in fig. In other cases, it is necessary to either use at least 2 points of the suspension, or the anchor of the lamp must put pressure on the material from above, i.e. Ceiling overlap must work on compression, pos. c) - e).
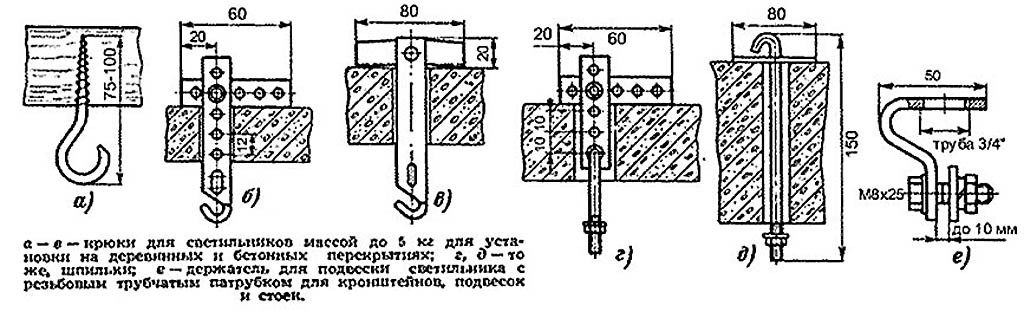
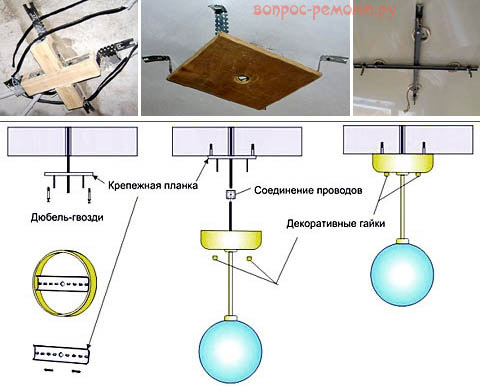
A chandelier weighing up to 5 kg is suspended using a fixing plate, see fig. on right. The distance between the centers of the fastening holes in the bar must be for a concrete ceiling, not less than 9 of their diameters. If the ceiling is plasterboard, or suspended, or tension, then the suspension is lowered from the main ceiling to the level of decorative, with the help of wooden crosses or from metal products or plywood slabs, above the same way. How to make a suspension in some other cases, look further.
The main requirement for the suspension is the lamp in no case should hang on the wires. It should be kept either a rigid rod, or a durable cord / rope, or a cradle from chains or the same cords. Under the suspension cap of the suspension, the power cable must lie free loop, and it should not be stretched anywhere, or clamped.
Now it will try to reduce the information received in a solid product, at the form of which guests are as mentally, as the master expressed to himself, working. We will be guided by the following principles:
Let's start with the chandelier as the most complex type of household lamp.
The simplest chandelier suspension weighing up to 5 kg - on the cord, pos. 1 in fig. In this case, in the lampshar mounting ring (see an article about lampshades) will have to additionally drill 4 holes; marked green on pos. 1a. Cord nodes need to knit not sliding and not dissolved, for example. Any fishing for hooks. The cord is any non-negative cross-tier (eg linen) diameter in a non-tentuent state from 8 mm. Cords and ropes of spiral ukiva are not intended for a long stretching load!
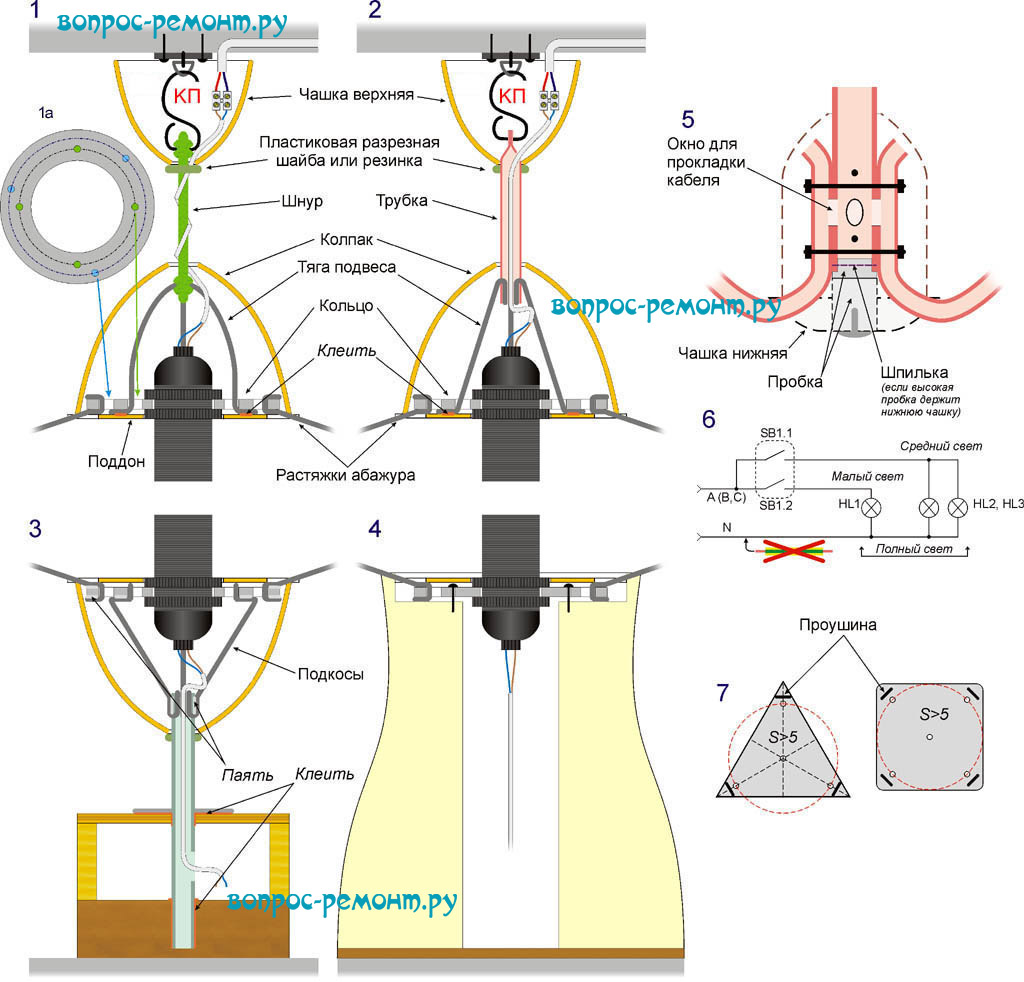
The most responsible detail is the hook of the suspension (red KP). It needs to bend from steel wire with a diameter of 4 mm; The hook of 6-mm rods will withstand weight up to 35 kg. Of course, if you buy a finished hook for chandelier, it will not be worse.
Suspension thrust with the same weight - from 4 mm wire; With a weight of up to 5 kg, it is possible to do with a 1.5 mm, and when weighing up to 12 kg - 2.5-3 mm. Ring - from a galvanized sheet 0.4 and 0.8 mm, respectively, or, for weight up to 35 kg, 1.4 mm.
Note: The technology of soldering steel at home is described in.
Fix the upper cup from climbing in this case is better than a rubber ring, because The spring washer can transmit a cable passing under it. A good pallet is obtained from a computer disk. Depending on whether the lamp is inhabser or in the ceiling, it is drawn down according to the painted or mirror side. Under the stretching of the lampshar in the pallet make radial rods.
Top cup and cap - from plastic dishes, see above. The cap lies on the pallet freely. Glue - any mounted.
Note: The bottom nut mounting the cartridge must enter the pallet hole, and not press it. Otherwise, it is difficult to repair or clean the chandelier.
In the chandelier suspended on a rigid tubular barbell (pos. 2), firstly, optionally bending the suspension thrust so that it is convenient to knit the knot at their crosspiece. Secondly, the amount of craving can be any of the 3rd. Accordingly, the ring can be done without an additional row of holes, which is described in the article about lampshairs.
The cap in such a chandelier is preferable to fix the shaped (decorative) spring washer. It can be obtained from thick plastic buttons, drilled in it the hole in the center by 0.5-0.7 mm already the external diameter of the tube and making a bias from the side of 45 degrees to the washer axis, the round link of the plastic chain with the same propyl, etc. P.
The eyelet under the hook in the suspension robe is obtained by flattening the tube and drilled in the resulting lamella (petal) hole. After that (and not earlier), the hole is drilled under the cable laying, otherwise there may be hazardous mechanical stresses in the material. The rod on the weight of the lamp to 15 kg can be made from the following types:
From the tubes you can make chandeliers with brackets for individual illuminators. The device of the node of the horn joints with a barbell is shown on the pos. 5. The horns at their even number are connected in pairwise through threaded studs M2.5-M4 with nuts and spring washers. The pairs of holes under the studs are located at different levels, it is necessary to take into account, calculating the height of the straight part of the horn and making markup on their billets. You can horn, incl. With the odd quantities, fix with pairs of small screws for metal, but it is necessary to delay the cables later, so as not to break the insulation about the sharp ends of hardware.
Note: Complex / extended bends of the tubes form the Pauchastkovo, gradually promoting the hand-made pipe bending along the length of the future bend.
If the free ends of the horns without Rogulin (sorry - wolves), etc. Curls, then the node of their connections with a barbell is better to cover with a cap lying on the bottom cup (shown by a dotted line for pos. 5). In addition, then the cable laying will be much simplified: a terminal box will be placed under the cap, in which cables from horns will fit, and up in a row will take only one 2-wire.
Molds are most often done with switchable light. The diagram of connecting the lamps to the 2-section switch is shown on the pos. 6. Do not forget - switches (switches) SB must be included in the phase wire! And more, extremely important: if the house is equipped with protective grounding, in no case do not use grounding wire as neutral (zero, n) Regardless of the power supply scheme (deaf-free or isolated neutral)! The earthing is always in isolation of yellow with a longitudinal strip, and the isolation of neutral in the properly arranged wiring is black. But in any case, before starting electrical work, you need to find zero and phase indicator-phase indicator!
Safety regulations (PBB), electrical installation devices (PUE) and vaults of rules (SP) production of electrical work for related industries (eg construction) uniquely regulate the coloring of isolation only grounding wires - yellow with a green strip; Colors denoting phase wires A, B, C and neutral, just recommended. The reason is in countries where the uniformly admissible is the power supply system with an isolated neutral (Germany, Japan, etc.) White or light gray, it is customary to signify the phase A.. Therefore, to choose from the available cables suitable to make the apartment wiring "without a bitch, Without a zadyrinka, "not always possible.
For ceiling lights with a weight of 15 kg, the mount on the 1st barbell or cord is no longer considered quite reliable. These must be switched on a chain or cable cradle from 3-4 branches. 1 branch should keep the total weight of the lamp with a 3-fold reserve.
To the ceiling, the cradle is fixed with a triangular or square carrier plate of steel thickness from 5 mm, pos. 7 in fig. The number of fastening points is 4 or 5, respectively. The attachment point in the center is obligatory: without it, if one of the angular fasteners will excessively weaken, the mechanical load "pointer" to the next weaker, the suspension breaks on the principle of dominoes and the chandelier "all suddenly" will collapse.
The angular points of the attachment should be located on the conditional circle (red dottedry) with a diameter of centimeters at least 0.85 weight chandeliers in kilograms. In any case, the smallest distance between the centers of the holes in the concrete ceiling should be from 9 of their diameters, as with a 2-point suspension on the bar, see above. Drains or hooks under the branch of the cradle to the bearing plate are welded. Homemade eyelets can be made from 6 mm rod.
Lovers make many lamps from disposable plastic dishes, PET bottles and paper. Their weight is negligible, therefore, first, the mounting of the cartridge in the lampshar / plastic is permissible to perform from the same skewed sticks, see fig. The cartridge in this case take E17 or E10 with the eyeles, see fig. left. The "ears" of the cartridge with the help of a sewing needle is simply primed to crossing sticks with threads, thin copper wire or fishing line.
Secondly, the suspension of the minor luminaire can also be made to the lulent, but from the fishing line. In the ceiling cap, its branches are entered with the cable, as for the chandelier on the cord. Such a suspension is almost invisible. If the cable (remind, it should not be stretched anywhere, shit or crushed) to send twisted or twist the spiral, then the intortable guest at first can be dumbfounded: Levitation? telekinesis? superconductor and magnets?
The floor lamp on the same structural and technological principles is in a generally inverted chandelier on a tough bar with some differences, pos. 3 in fig. Above with the designs of the lamps. The first: bar (which is already a rack) - made of steel pipe with an inner diameter of 10 mm and a wall thickness of 1.5 mm. Ring - galvanized from 0.7 mm. Second: all the joints of steel parts are disappeared.
Next, in the lower support of the lacker, a sufficiently heavy and extensive design for fastening the bottom of the rack should be provided. Under the flooring of the usual type, the cross will go about 450x450 mm from the oak bar 100x100 mm. In it, the deaf hole is drilled in the center of a depth of 75-80 mm along the outer diameter of the rack, and it is pasted into the jack with mounting glue. Also put the rack in the floor shelf. It will be useful, both in design, and in strength, put on the glue also and polished washer with a diameter of 60 mm and a thickness of 2 mm (steel) or from 4 mm (aluminum). The design described allows an amateur in the manufacture of a flooring to do without accurate to order details.
The working desktop lamp on our principles of construction is even easier to lapse, pos. 4: A sufficiently massive and durable base (wood, plastic) with a stepped through hole along the axis. The launch of the lamp is stacked and fastened with self-drawing. Then it will at the same time will fit the mustache struts of the lampshar and it will not hang out.
Note: For the base of the desktop lamp from ceramic or glassware, it is necessary to make an embodied on its neck with a stepped hole. The most suitable material for this is plastic.
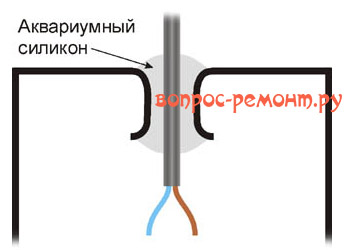
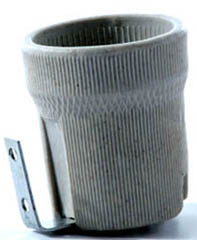
Outdoor lamps on 220 in leave the purchased: make "Forever" a hermetic cable input on the network voltage and also a hermetic case with glass at home is impossible. We will work with stresses up to 12 V, then the cable entry is obtained quite simple, see Fig. And if the source of light is powered from the current stabilizer, then there will be no scary.
However, before electricity, the case may not reach: for temporary lighting in the garden or on a picnic and in the 21st century it is often more convenient and cheaper than the ordinary candle is, it is also romantic. And you can make a candle lamp with your own hands from a coffee jar literally in a few minutes, see video:
Such a lamp is also suitable for light bulb; Then it disappears the need for ventilation holes and the carrying handle can be fixed on the lid, which is more reliable.
A constant outdoor lamp must already be electric. The main problem is reliable sealing. Here again cuts the glass dishes with an injected lid: the lamp of the outdoor lighting is well obtained from the bank. In this case, because The light source is required more powerful, it is better to take a vessel from under conservation. The cable entry nozzle is made by breaking through the lid with a circular pointed rod. For complete tightness on the rim, the covers from the inside before screwing time and forever apply aquarium silicone.
The lamp "times and forever" involves the use of very reliable and durable light sources. Requirements for its quality and spectrum are departed into the background, because Lights not a residential or work room. Taking into account these conditions, the outer lamp on the porch or, let's say, at the entrance to the garage, it is better to do from the LED tape: it will give enough bright lighting with insignificant electricity flow. For an example of the manufacture of such a lamp, see:
In the garden, and in general, the large brightness of the lighting is no longer needed, here, in general, just from the track, you can not get the door to the bath, cellar, shed or bathroom to see. But the garden lamp is quite and very desirable to have autonomous: it's not about electricity in expenditure, but on the cable, and to whom will it like to smut the well-groomed plot with testers?
Garden lamps with solar panels (Sat) and buffer battery (AKB) are on sale but, or are expensive, or are short-lived. Let's try to estimate whether it is impossible to do without it, especially since it is possible:
The scheme of the autonomous garden lamp, built according to the conditions described, is shown in Fig.:
![]()
Despite the simplicity, the battery is never brought to degradation of the active medium due to the rearrangement and only in exceptional cases can reach a deep discharge; Therefore, its resource remains normal during operation in severe temperature conditions. "Raisin" here - Sat. Their internal resistance is large and nonlinearly, in a power law, increases with an increase in the load current, as a result of which the CW COP is only not much more nominal. From this point of view, in this scheme it is more profitable to use less expensive polycremium Sat.
The UU control device closes the switch S when the Sat voltage drops to the "twilight" level. VD1 by that time closes and the battery charge stops. Wu is connected to the battery only for power supply. Switch - diode or transistor optocouple or electromagnetic relay; In this case, it is better for the germ, because The usual low-voltage coil current will take more than all LEDs. In this case, it is impossible to use a thyristor optorone in this case: so that the thyristor opens the current, the current through it should fall to a very small value, almost to zero. Since the current here is a permanent, thyristor, once revealed, will not "leave" until it does not plan the battery.
Special linear fluorescent lamps are used to illuminate aquariums. Not such as phytolamblupa for flower shelves: the spectrum of aquarium lamps is fitted for the optical properties of water and the life needs of aquatic plants. Those and other lamps for general lighting of the premises are unsuitable: the light favorable photosynthesis is by no means useful for human vision.