How to make lamp lamps do it yourself
It happens that so you want to update the interior, but it is not known where to start. Sometimes you just need to change the lighting. But buying a new lamp costly, and in some cases it is not even required. We invite you to consider several master classes on how to update the downtown
What you need to create lamps
Update lampshades for their own hands can be absolutely any materials:
- cloth;
- artificial colors;
- skin;
- threads and rope;
- paper and so on.
Also be sure to have such tools such as scissors and a glue gun.
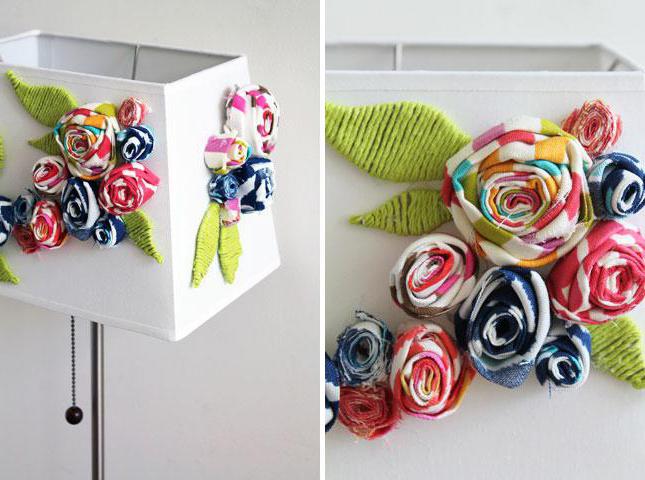
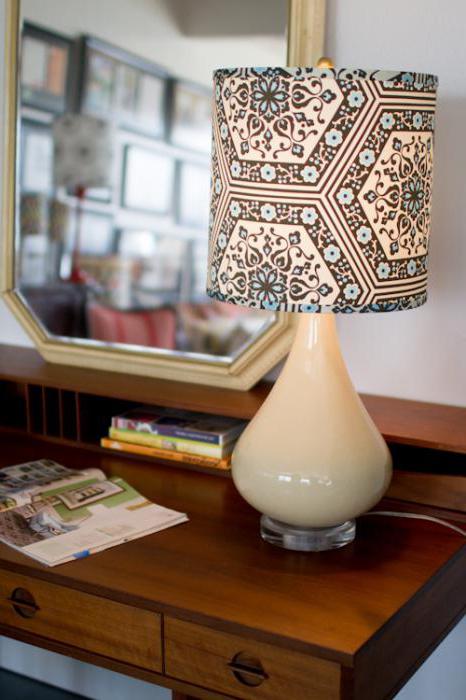
Simple and original way to decorate the old lamp
Such lamps are very well suited for the female interior in the style of chic. To give the lamp to the lamp, take such materials:
- shade;
- artificial flowers (color browsing can be bought in stores for creativity, but you can buy bouquets and cut off the caps from them, sometimes it turns out cheaper);
- glue pistol;
- scissors.
Master class, how to update lamp lamp lamp with your own hands:
- Cut from the colors extra pieces of the stem, leaving only a cup that connects the petals.
- Heat the adhesive gun.
- Apply a little hot glue to a cup of one bloomer and stick it to the lampshar. Start working from the upper or lower edge. Flowers glue either in a circle or in the rows, tightly pressing them together.
- Hot glue dries quickly, so work carefully.
- When you attach the entire lampshade, flourishing the flower petals.
Tip: Interesting lamps for desktop lamps are obtained with a combination of several colors that smoothly flow.
Geographical lampshane
Such a lamp will look great both in the living room and in the child's room.
You will need:
- shade;
- map;
- tape;
- pVA glue;
- some water;
- brush;
- adhesive pistol.

Master class, how to make geographic lamps for desktop lamps with their own hands:
- Prepare a map. It can be bought in the store, print either it can be special sheets for decoupage.
- Mark the required width on the map and cut the rectangle. If you are not enough for you to completely wrap around the lampsier, add another piece.
- Divide in a small amount of water.
- Cover the map on the reverse side by glue and gently stick it to the lamp. To the fingers, smooth the pummers, if such appear.
- Wait for complete card drying.
- Cut extra pieces of paper.
- Preheat and with it take the tape along the edge of the lampshade at the top and bottom.
Geographic lampshade ready!
Books Sheets like decor
Similarly, as in the previous mater class, you can decorate lampshades for using bookpasics.
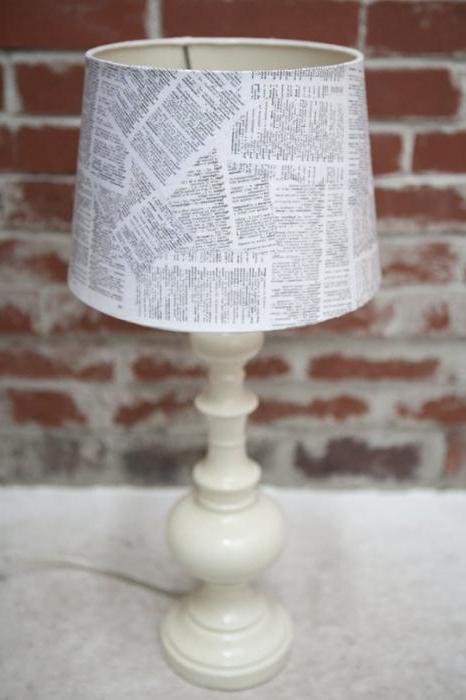
To do this, shoot a few sheets from the old book and hang their edges so that they are not shabby. Lubricate each sheet with PVA glue and glue it to the lampshade in chaotic order. At the edges, paper should perform a little. When all sheets are pasted, overpower the edges inside.
Warm shameter with the effect of ombre
Such a lamp is ideal for the cold season, as it will make a height of heat and comfort to any interior.

List of what you need:
- shade;
- several types of yarn suitable for each other in color palette (for example, white, dark blue and turquoise);
- adhesive pistol.
Master class, how to make a beautiful lamp lamp with your own hands:
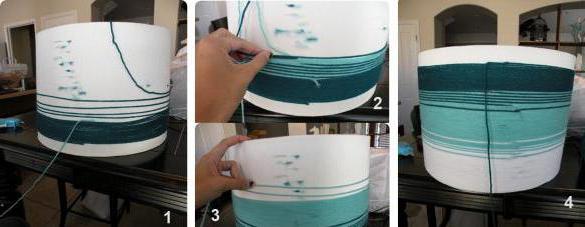
- Put a small drop of glue just above the base of the lamp to the lamp (approximately at a distance of one centimeter from the edge).
- Stick to a drop of one end of yarn. Choose the one in which the shade is darker.
- Wipe the lampshade yarn, trying to make each new row firmly faced the previous one.
- Mix a certain height in one color. The last turns should not firmly fit together, and be at different distances, a little chaotically cover the lampshade (picture 1).
- Stick with an adhesive gun yarn another shade. The new color must be on the level of the old (picture 2).
- Wash the yarn around the lampshar, while you will have to prevent two colors in some rows. It is necessary that the shades have a smooth transition and the striped pattern did not come out.
- When you wrap the required level of the second color yarn, make several free turns (picture 3).
- Mix the third color of the yarn, not forgetting to glue the tip.
- Complete the amusing of the lamp. For this, the third yarn should go dense rows to the edge of the lampshar, and the end is sharpening (picture 4).
- Turn over the lampshade and domidate yarn to the end.
Warm abazhur ready!
Shades with roses
You will need to take such tools and materials:
- shade;
- cardboard;
- pieces of fabric;
- green yarn;
- tape;
- glue pistol;
- scissors;
- pencil.
Master class, how to decorate the lamp shade for a table lamp with your own hands (the photo of the process is attached):
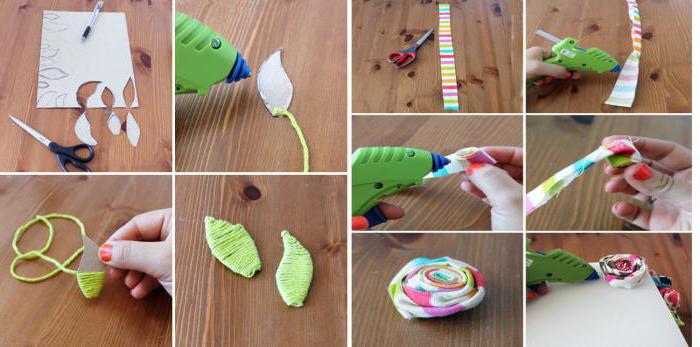
- Draw on the cardboard floral leaves, and then cut them out (picture 1).
- Stick to the edge of green yarn with a glue gun (picture 2).
- Motion tightly yarn around the leaflet (picture 3).
- Stick the tip's tip and make a few more leaves (picture 4).
- Cut from the fabric several strokes with a thickness of about one or two centimeters (picture 4).
- Fold one strip in half, drunk a little glue inward over the entire length (picture 5).
- Tightly twist the strip, sometimes dripping glue to the edge so that it does not comply with (pictures 6 and 7).
- Roll into a little edge of the figure, and you will have a rose (picture 8).
- Make a few roses, different in size.
- Gently stick roses at the lampshade (picture 9).
- Do not forget to rinses in some places leaflets.
Volumetric lampshade ready!
New ombushur with the Effect of Ombre
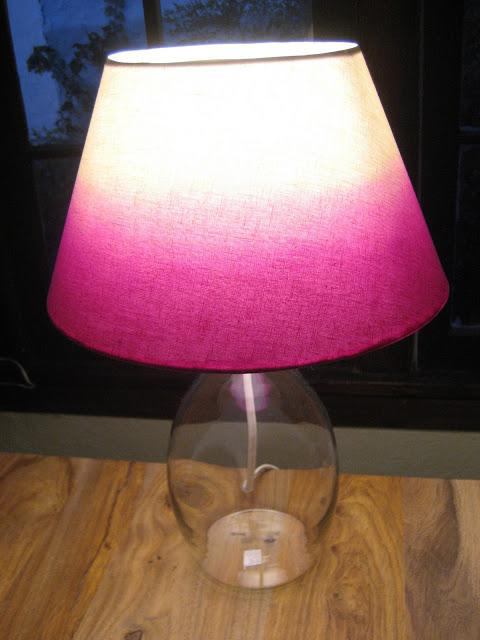
To make a smooth and beautiful transition of one color to another, a suitable coating is necessary. To do this, it is recommended to make lampshade with your own hands.
You will need:
- lamp shade;
- cotton monophonic fabric (preferably white, beige or light gray);
- little bath or basque;
- paint (watercolor, for hair, for fabric, gouache and any other liquid);
- adhesive pistol.
Master class, how to make a lamp lamp lamp with your own hands with my ouston effect:

- Take the lampshade frame and fabric.
- Turn on the adhesive gun.
- Wrap around the lampshar cloth and gently glue the edges. Excess the cloth cut off.
- Top and lower edges Wrap inside the lampshar and glue them with a glue gun.
- Fill the basin or bath with half water and dig paint in it.
- Lower the lampshade not completely in the bath and pull it out from there.
- Do this procedure several times, gradually reducing the height of the dipping. Thus, the paint will be absorbed again at different levels, creating a smooth transition of shades of one color.
- Hang up lampshade in the bathroom and let him dry.
All is ready!
How to make label from scratch
In the previous master class, it is told how to upgrade the boring or outdated lampshade. And what to do if nothing to work with and not even framework? Then you can easily make the lamp shade personally.
For this you need to take:
- the cloth;
- malyary Scotch;
- large line and centimeter;
- pencil;
- scissors;
- plastic sheet (can be found in construction stores or among needlework goods);
- wire rings;
- large clips-clothespins;
- pVA glue or;
- glue pistol;
- special splitter for lamps (sold in lamp stores).
Operating procedure
Master class how to make a new lamp lamp with your own hands:
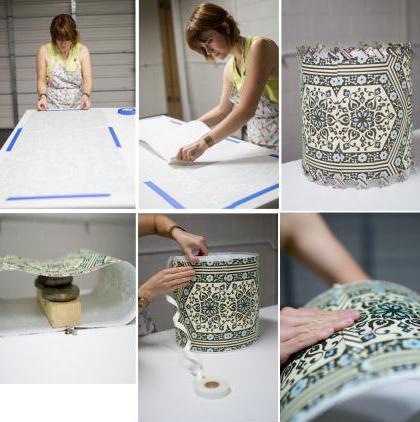
- Take a centimeter and measure the diameter of your wire rings. It will be the diameter of the lampshar.
- Put the plastic sheet on the table and measure the length and width of the future lamp
- Cut the placed rectangle.
- Expand fabric on the table with an invalid side.
- Secure the edge of the cloth so that it does not move.
- Cover the plastic rectangle layer of PVA or bilateral tape.
- Gently attach a rectangle sticky side to the fabric.
- Press the fabric to the sheet and roll it up.
- Cut excess fabric.
- Twist the cloth.
- Spread the cloth with a glue gun.
- Connect storage with closures and put the item on the table.
- From above on the seam, put the load so that it does not worry.
- Wait dried the part.
- Place inside the details on top and bottom over the ring.
- To the top ring, attach a special splitter.
- Enclose rings with a glue gun.
- At the edges, pin the clips-clothespins so that the rings are better glued. Leave the detail for a while.
- Stick to the top and bottom of the lamp tool tape, half of which wrap inside.
- Cut the strip of fabric, turn it out and stick to the seam.
- Cut two more fabric strips, also turn the edge and glue them to the top and bottom of the lamp.
- Wait until all the elements are dried.
Brand new absentee is ready!