So, having understood how correctly, we carry out its main lighting and at the same time decorative elements: lampshade and ceiling. Reflectors are technologically easier; Their manufacture and fastening to the carrier design chandelier of difficulties does not cause.
The Internet is full of pictures with really very beautiful homemade luminaires. However, considering them check out the question: how to replace the light bulb? The answer is not always located in the original sources. Methods for fastening the lighting elements in the lamps that allow the replacement of the lamp without the use of the tool will be considered in, but described later in this technological methods are calculated on the fact that the lampshade in this case or shifts up, or is removed down, or you can simply get into it.
In the order of increasing complexity (and longevity), the products of lampshar and ceiling, with their own hands at home, can be made of paper, plastics, threads, ready-made tubes of various kinds, twine or yarn, frame with fabric cover and stained glass. The last 2 are quite complex, but with a skillful approach to work on lighting and decorative qualities can exceed expensive purchased.
Make paper lampshade is easiest: From materials, except paper, you will need threads and PVA glue, and from the tool - a sewing needle, scissors and, possibly, a sharp mounting knife. However, paper lampshades are fragile and therefore suitable mainly for chandeliers. But the ruined lamp shade is easy to replace new.
Make a paper lamp is somewhat stronger in various ways. The simplest is to dial the glue-ball strip ball, glueing them on the poles and among themselves, pos. 1 in fig. However, the design in this case is uniform: sufficient strength of the product is provided only and only its spherical shape.
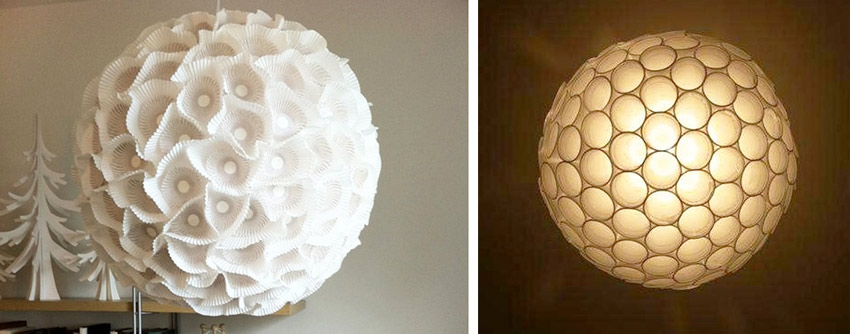
Another way is to strengthen the paper itself. It will require a little additional material: a copper enamel winding wire with a diameter of 0.25-0.4 mm or thread. In the first case, the lampshade will be used without additional hardening and for the lamp, and in the second for overhead decorative elements it will take a solid bearing basis, for example. From a plastic bottle. Strengthens paper for lampshar with wire as follows:
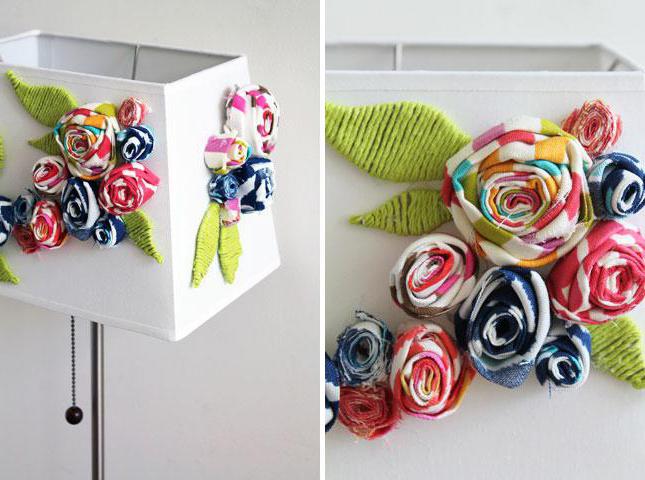
When using threads, both sheets take a density of up to 60 g / sq. See, then, it is said, the bearing basis will need, but it is possible to imitate even the texture of rose petals, pos. 3.
Note: Paper lampshade, durable "almost like real" can be made from papier-mache. Technology, enough, time-consuming, is described further, see the downtown for the kitchen.
It is elementary to make a lampshade for chandelier of disposable plastic cups bonded by a stapler, see fig. Its lighting qualities are very good, but the view is frankly utilitated. Therefore, such lampshairs make sense to apply indoors with fairly high requirements for lighting quality, but not frontal. The radiation diagram (DN) lamp shade from cups forms cardioid.

Label lampshade
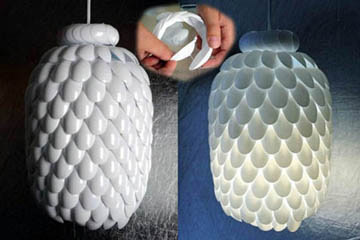
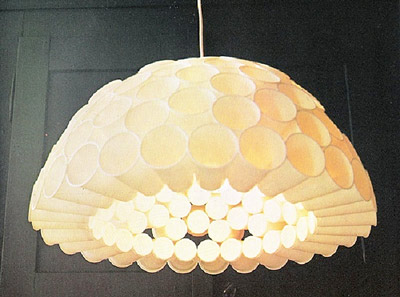
Ferric DNs with a wide open, very mild light in the central spot and uniform illumination in the side zone, allows you to achieve a lamp with a lamp lamp (or pineapple?) From blurred plastic spoons based on a bottle of PET with a cropped donkey, see fig. Effective light mitigation is achieved by the fact that spoons work as translucent cup-shaped reflectors. They are glued to the bottle and glue with a silicone, assembly or adhesive gun glue. Cyanoacrylate glue is also suitable, but it needs to be taking thick. The cheap "superclauses" is very tech, the droplets will vomit everywhere and will reverse the glossy surfaces of spoons.
From the same bottles, too, you can do good lagging lamps. For example, the sphere from their bottoms, bonded by the stapler, as well as stopper cups (mini-master class, see fig.) Dast cardioids; True, compared to the "tired" noticeably distorted. But in the country or in the utility premises, the chandelier from the bottoms will be quite useful.

Abazhur from Dyshek Bottles
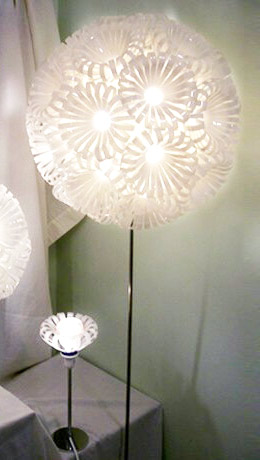
Romantic soft light, a little spotted, but within the limits of allowed, will give a ceiling ball from bottled "hedges"; True, they are more like blossomed marine anemones - Actinia, see the photo on the right. It is easy for "hedgehogs": the bottoms are cut off the bottles, the side walls are cut to the scar before narrowing in the neck, the strips are wrapped on the neck, glued with droplets of glue and fixed with threads or scotch. However, a transparent spherical basis will need a transparent spherical foundation for the assembly of "hedges". It is obtained similarly to the lampshade from the threads (see below), only the threads take white kapron or propylene not the thicker of the 20th room, but instead of PVA - a colorless acrylic lacquer on a water basis.
Very uniform illumination allows you to achieve, and very decorative, lambs of leaves cut from bottles, see fig. The assembly of it leads on a temporary spherical mandrel, see below.
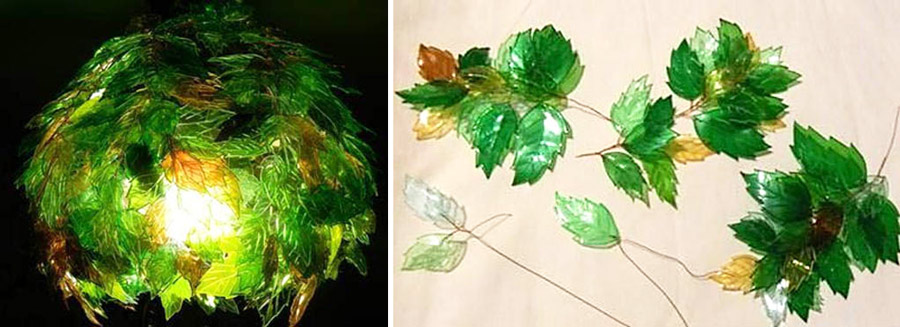
A step-by-step master class in this case is also low, but requires patience, accuracy, some additional tool and, possibly, material:
The procedure for manufacturing Christmas decorations and luminaires from threads is described in RuNet many times. For example - video:
Here you can only note that, firstly, the threads on the laid-sized lampshade will need at least 100 m. Secondly, it makes no sense as the mandrels of inflatable balls: after 10-20 turns under the pressure of the stretched threads, the ball is pronounced. And in the end it turns out something uncomfortable. Thirdly, it is not necessary to soak threads in a flour ceased in advance: the product will be fragile and not moisture-resistant.
As a mandrel in the manufacture of lampshar made of threads, it is best to use a tight inflated camera from a sports ball or durable, inflated from the pump through the nipple, a silicone beach. The mandrel is lubricated several times with Vaseline (Lanolin), thoroughly rubbing it with his hands. The ball does not hurt; On the contrary, it will extend his life.
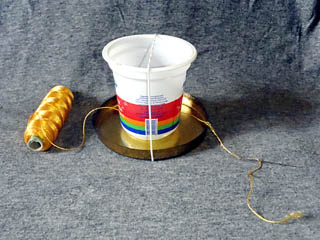
Next, the thread on the mandrel is wound, continuously stretching through the simplest device, see fig. This mini is an impregnating bath, so that he did not accidentally crawl, did not overturn and did not pour something glue, they fasten the tape on the table; Comfortable double-sided. The cup is first pushing the needle with a thread, then pouring PVA or acrylic varnish and shake, tightening as needed. Usually the thread goes through the bath itself, because Glue, until dry - good lubricant.
When winding, do not forget to leave the window for entering the cable and the cartridge - the strength of the cutting thread sharply falls! A day later, at its end, they produce air from the mandrel and pull it out through the same window. To threads, she, "favored", is glued very rarely and irrelevant: it is possible to tear off, slightly pulling or giving the finger, and the product remains safe.
Note: Instead of threads, you can use jute, sisal or propylene twine, but in the lampshar there is better use, see below.
Plafones-balls, see fig., Suitable in the nursery, because Form smooth soft light. The one that on the left, from paper wrappers for cupcakes - based on the filament ball. Threads - propylene or subtle categorous colorless; Binding - acrylic varnish. White in the coil, after impregnation with varnish such threads become almost transparent. Shade ball from cups (right) is not so interesting, because The sudinki is all the same, but also to refine it harder.
In the hallway, the lampsphere from the same cups is suitable, see fig. on right. With a small power of the lamp (more precisely, its light stream) will give a bright spot below and an acceptable illumination of the rest of the room, so you can use a little burning incandescent bulbs by 15-30 W. The fact is that the resource of lamps and LEDs with frequent turning / off is sharply reduced. And the low-power incandescent lamp, especially in the hallway, where the light is constantly not lit, the cost of electricity will not significantly increase.
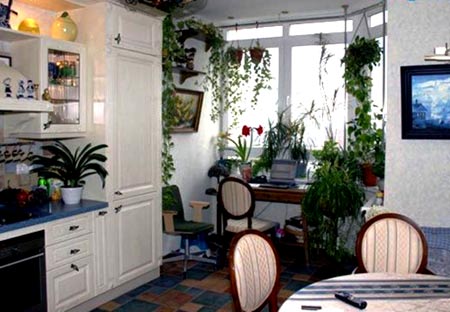
Special case - kitchen. Requirements for lighting in it are set out in the previous article. But the lampshade in the kitchen quickly gets dirty, and soot eats hard. Recall: Bright light contributes to condensation and bituminization of the vapor of organic compounds. This is the deposition of soot; The lamp is also covered in brighter.
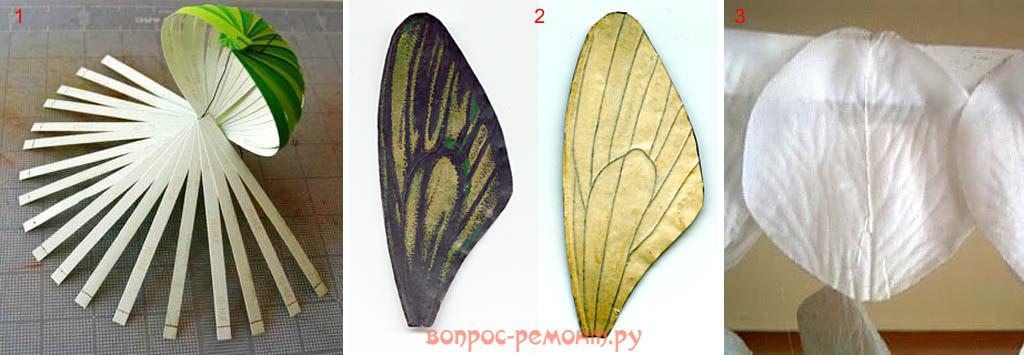
The simplest way out is disposable paper lampshade. "Cryer", as for pos. 1 Fig. Below, it will make the nature of the lighting just necessary in the kitchen, but it will have to re-attend it quite often. It is better to define on a suitable mandrel launcher from Papier-Masha, pos. 2. After the varnishing of acrylic varnish, it can be carefully soaked with a rag with washing for dishes, and painted with a blacksmithing patina, it will be similar to a wrought handmade and no one there are old newspapers.
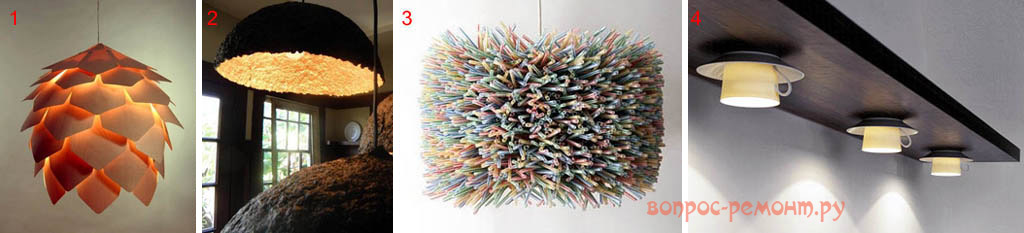
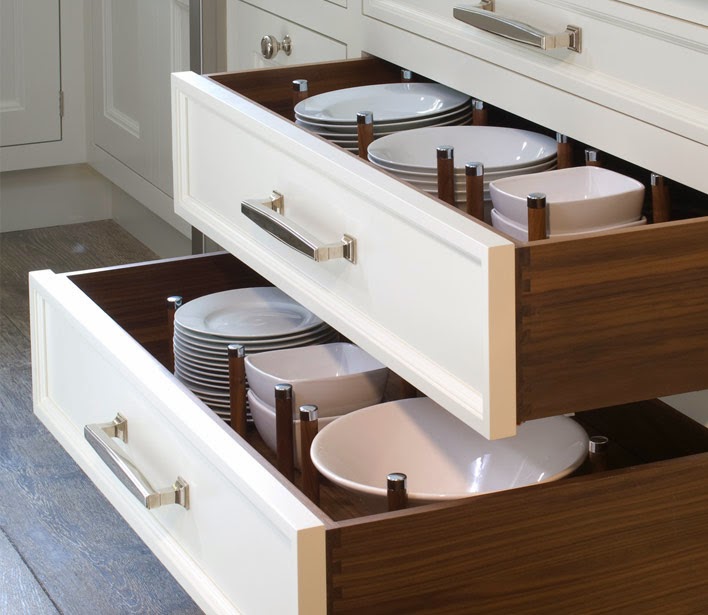
But the lampshade on the pos. 3 - straws for juice glued to the bottle - an example of an unsuccessful solution. The light of such a lampshade will give the ideal for the kitchen (the straws work partly and both light guards), but it is blocked quickly, you will not be patched as it should not, and the product is time consuming. Plastic reflectors of kitchen lamps of local illumination is better made from multi-precision plastic dishes, pos. 4, it is quite a rack, inexpensive and easy to clean. Cups with handles and saucers, of course, the case of a designer solution, but the piles are without a picture - what is needed.
Papier-Masha material useful for many purposes, so we recall the technology of its preparation and application:
The lamps and plaffers made of cuts of the tubes most often for night lines and lamps in the bedroom: as a result of the round section, there is always a significant refraction of light, which can be very intimate-romantic, but for constant and working lights in most cases undesirable. Pretty spotted light gives labels from translucent tubes, see rice; If you use the segments of a thin transparent PVC hose, then the game of light will turn out very beautiful, but it is not necessary to look at it for a long time and all the more read or sew with such a light.
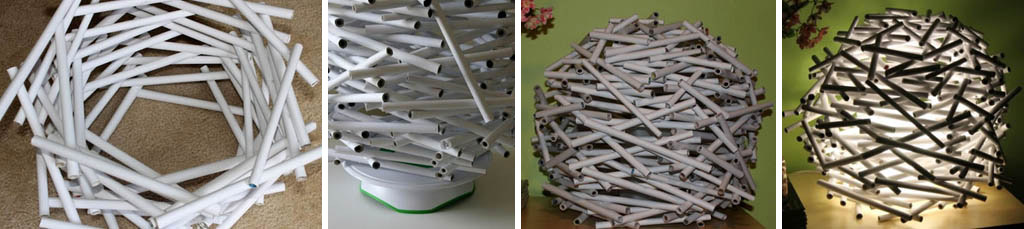
Paper and other fibrous materials light refit for little, but the tubes of them themselves are fragile. For example, the lamp shade from newspaper tubes is better to do on the frame, see below: just because they are easily embarrassed, thin paper tubes are excellent material for weaving. As for lighting properties, then the paper, especially clean, they are excellent.
Now proceed to lampshaps that are suitable anywhere, incl. And for a table lamp, which elbow can shove on the floor. In addition, we will put the condition so that the lamp to the lamp can be washed, cleaned, change at will. Therefore, glass or solid hard plastic lampshades do not touch; They also can not be done at home. Those., Engage in lampshades on a skeleton frame.
The decorative light case of the lamp is preferably sewing from a tissue with darous threads, i.e. Natural. Due to the diffraction on smooth threads of synthetics, the light penetrating through such a lampshade can be tough. Choose a cloth for lampshar on-eye is easy: through the sample, swing it smoothly, look at some compact bright light source; Preferably LED, because It gives the most coherent, i.e. Ordered, light. The criterion of choice is simple: the less observed at different angles of view of the moar stripes, the fabric is better.
The lamp shade is pretty laborious and complicated technologically, so first it is necessary to look at the farm: whether the lampshade from the old lamp did not break down anywhere. Stop it, repair and update the lamp to the new case will be easier than to make a frame from scratch.

The detected "basket" may be very cleaning form, and to build grids (see below), it will be necessary to measure its diameters in several places. In this case, the self-made caliper from 3-wooden plates and pairs of drawing apartments will help. It, of course, will not give, but reachable (+/- 1 mm) for crude-sewing work is enough. And the idea of \u200b\u200bthe possibilities of such a tool gives rice.
Measurement procedure 2-speed: on sponges in touch places they make a pencil mark, and then remove the size between tape measure. So that the moving sponge slid more smaller, and, accordingly, the measurement was more accurate, under the holding of its gums you need to put the fluoroplastic film. To measure the small diameters of the sponge roll over with coats outwards.
Now remove the necessary diameters: lower and upper hoops (D1 and D11 in pos. 1 in Fig.), The largest and smallest on the belts (D2, D6, D10), in the locations of the beggars, i.e. Where the curvature of the forming changes the sign (D4, D8) and on the breaks (D5). Others take more or less evenly between mandatory.
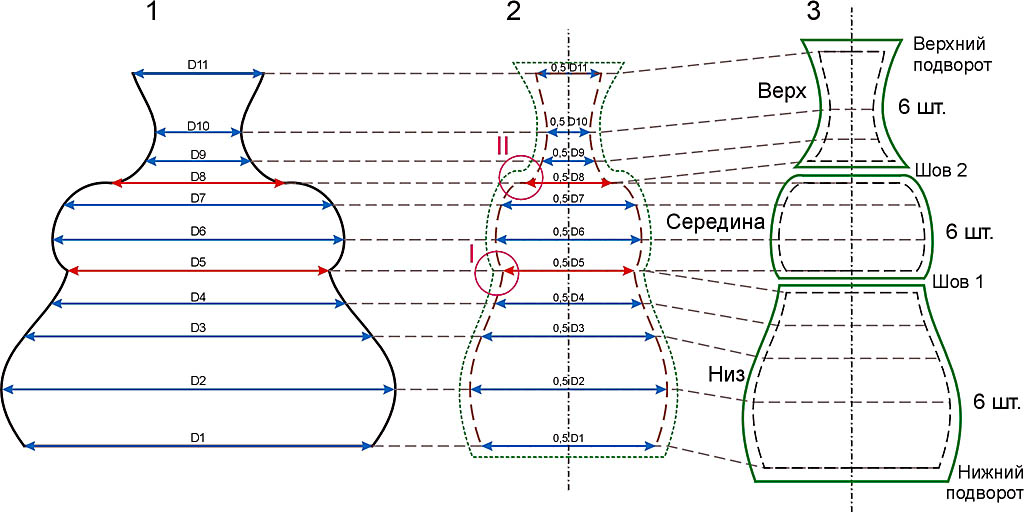
Pictures of 6 wedges will, taking into account tightening of the fabric, are equal to half the measured diameters (pos. 2). If the wedges of the finished sleeves are supposed to be more or less, proportionally change the share of the diameter in the corresponding diameter of the pattern. But it is too early to cut and sew.
In the same place for pos. 2 It can be seen that the crosslock is geometrically not completely similar to the template. In the node I (breaking inside), these are still Polbies: you can put a silent-scene and tighten the seam with a cord. If the lamp decor suggests Ryushi, ruffles, festers, etc., then it may be necessary: \u200b\u200bsmall folds will come to the place, and in the breakthrough circuit, the cord will not be visible.
However, on the circuit shelf (node \u200b\u200bII), if neither twist, but give the allowance so that the seam does not leave, it is not possible. In the highest geometry, it is proved why, but we don't need to climb into these debursions: we simply cut the paper template for "capricious" diameters on the breaks and shelves (pos. 3).
Now, like on our patterns to sew a lampshade? First sew individual parts of the sleeve; In this case, the bottom, middle and top. Then to the widest belt (bottom) are sewn the largest part in the width (here - the middle). Next, in the same way, stroke 2 following the width of the part, etc. The bottom line is that the shortest transverse seam (we have 2) stacked last. In this sample, after stitching, niza with the middle to sew the top. It is completed by sewing the cover of the trimming of excess points, except for the lower and upper socios. Edges necessarily handle.
The next stage is landing the case on the frame. Here, the machine can be sent to the chulad: the work is exceptionally hand. Phasepno tight carcass of the lampshar case is made like this:
How the simplest frame of the lamp lamp or a lamp is arranged, can be seen on the pos. 1 Fig. Suspended for chandelier is distinguished by the fact that the ring will be at the top, the stretch marks will go to the upper hoop, and then additional holes are needed to fasten the suspension.
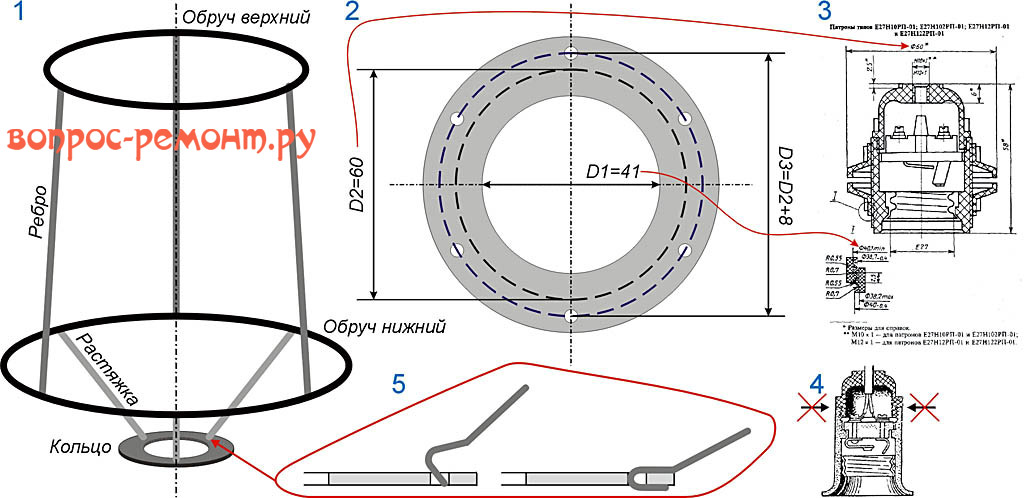
The ring is cut out of a well-soldered and sufficiently durable sheet metal (bronze, brass, galvanized steel with a thickness of 0.4-2 mm) or durable plastic from 1 mm. A computer disk is suitable, under the E10 cartridge, it will only need to drill holes for stretching and fastening. The main dimensions of the ring under the E27 cartridge with the fastening of the catching nuts (pos. 3) are given on the pos. 2. But to make a ring for fastening into the gap between the case and the cartridge clamp with the skirt (pos. 4), is unacceptable! Such cartridges are attached only by a threaded fitting in the lid!
How are attached to the row of stretching, shown on the pos. 5: Their billets bend the crochet not to the end are injected into the mounting holes and carefully live in passage. Then, if the ring is metallic, pecks (see below). If the plastic is fixed with droplets of superclaud or silicone.
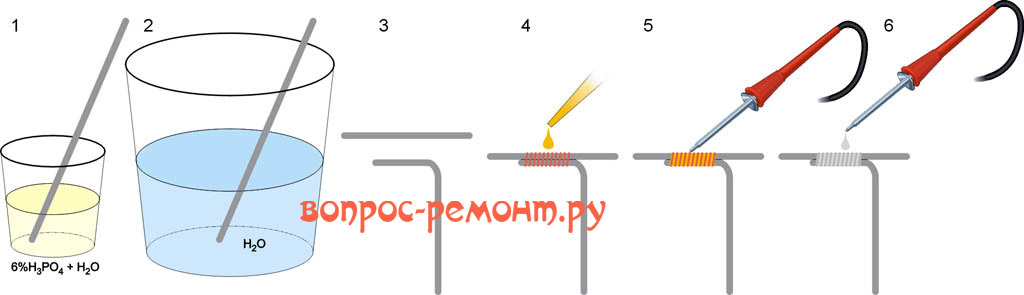
Frame details make from plastic steel wire with a diameter of 1.5-2 mm or cycling spokes. The latter is much stronger, do not rust and do not require painting, but they need to be bend carefully and they are worse. For soldering, the carcass will need:
Note: Orthophosphoric acid of medium power, highly toxic and / or caustic vapors does not exude. But still, when working with it you need to follow the precautions - wear safety glasses and gloves (domestic latex).
Key framework assembly procedures on soldering are shown in Fig.
Phased solder steel frame collected as follows:
Propylene packaging twine and paper tubes have good lighting properties. If the lamp shade is to make wicker from the twine or from newspaper tubes, it will give a smooth soft light, and squeezed out-of-sowed-sewing work. But in the frame for a wicker lamp, first, at first, at least 10-12 ribs, evenly arranged around the circle.
Note: If the frame is a simple form, then carriers (steel) can only be 3-4 ribs. Let them be even straw, they are glued to the upper and lower hoops.
Secondly, to get rims at the top and bottom, acc. The training is either made twined in height, with a period of 2-3 cm, or the strips of fine metal or rigid plastic of the same width are attached to them. The rims are needed on decorative considerations: solidly wind by twine or tube, and if the rim is double, weaving can be used eight. The entire side surface is brazed as a basket.
Stained glass lampshades form light stream predominantly refractiveness, so more suitable for the living room.
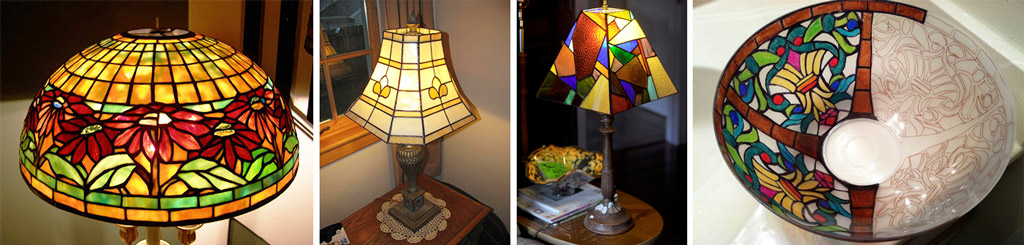
stained glass lamps and ceiling
Stained-glass fragments are gaining from rhinestones, faceted or cabochon. The lampshade-stained glass window is going to the heat-resistant mandrel (eg steel bucket). But compared to the stained glass window for the window or door here, since the connections of the elements are not solid, and point, there are significant differences:
Soon the new year, it's time to do. And - New Year's chandelier. Lastra? Yes. Remember how the festive mood falls if the top light is included in the room with a Christmas tree. What no, but the New Year's lighting should correspond to the spirit of the holiday. Lighting equipment will postpone the days of serious, in a few evenings nothing from festive light will not happen to us. The case, it is time, but also fun hour.
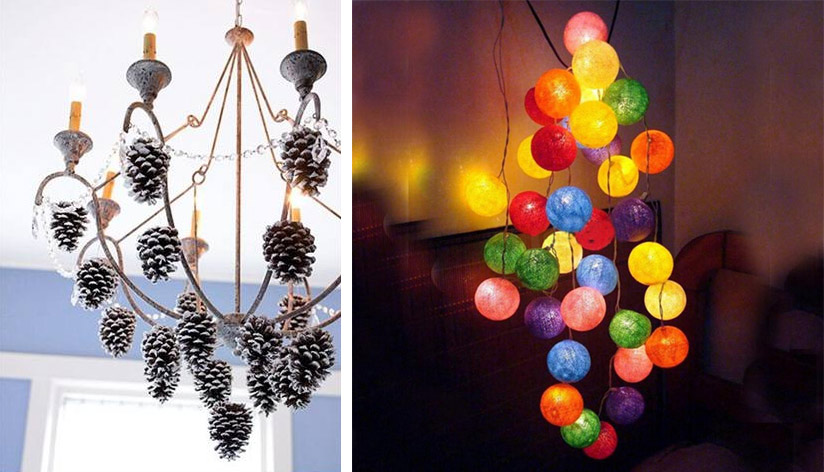
Usually a New Year chandelier - attached to the chandelier in the living room Christmas wreath with light bulbs woven into it. But it would not be necessary to engage in electric mounted work at the height in the pre-holiday turmoil. And what if the Christmas tree in the nursery, where is the chandelier paper? Then you can at least buy inexpensive plastic blanks for the Christmas balls, the garland with colorless light bulbs, to hove them into the balls, and hang such a heap (on the left in Fig.) It is more convenient.
If the design "everyday" chandelier is suitable, you can screw the candles lamps into it and decorate the same balls or, for example, painted with bumps, right there. And you can try a little and make the New Year's Lastra-Jasmine with your own hands, as in the video below. New Year is the new year, which is not talking.